
Introduction
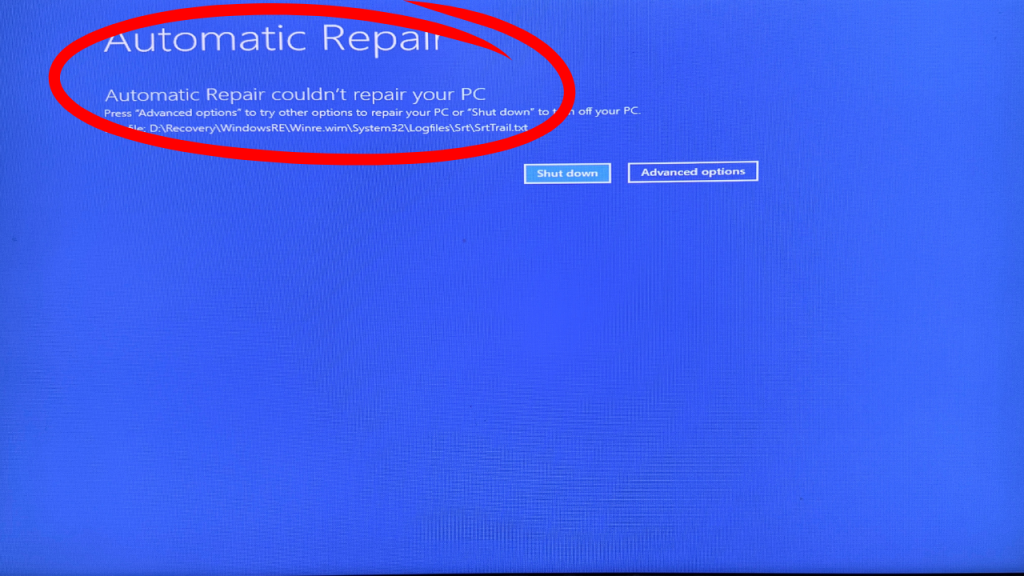
If you’re trying to fix boot and couldn’t repair errors on Windows, you’ve probably seen a blue screen message saying Automatic Repair couldn’t repair your PC or Your PC did not start correctly. This issue often appears on Dell laptops and desktops, but it can happen on any Windows system.
Boot errors can be stressful. They stop your system from loading, and you may think your files are gone. The good news is that in many cases, simply adjusting the boot mode settings in BIOS can fix the issue instantly—especially when the system is stuck between UEFI and Legacy boot modes.
This article explains the exact steps to fix boot and couldn’t repair errors on Windows, why this issue happens, and what to do if it continues. You’ll also get a short video script section, FAQs, internal resources, and external trusted links.
Table of Contents
Why Windows Shows “Automatic Repair Couldn’t Repair Your PC”
There are several reasons your PC might show this blue-screen error:
Why Windows Shows “Boot and Couldn’t Repair Errors”
Windows may fail to boot due to:
- Incorrect boot mode (Legacy vs UEFI mismatch)
- Corrupted bootloader
- Damaged system files
- Recent hardware changes
- Improper shutdown
- BIOS reset or update
- Wrong drive selected as boot device
Most Dell PCs ship with UEFI boot mode + Secure Boot enabled. If these are changed, Windows cannot load properly. This is why your script works so well—it restores the correct boot configuration.
How to Fix Boot and Couldn’t Repair Errors on Windows (Step-by-Step)
Here is the complete article-style explanation of your script, expanded for clarity.
Step 1: Shut Down the PC Completely
Hold the power button for a few seconds until the computer turns off.
This ensures the system resets all temporary boot states.
Step 2: Start the PC and Continuously Press F12
Press the power button and immediately start tapping F12 repeatedly.
On most Dell systems, F12 opens the Boot Menu, allowing access to BIOS, diagnostics, and boot settings.
If F12 doesn’t work, try:
- F2 (for BIOS setup)
- ESC (on some models)
But for Dell, F12 is typically the correct key.
Step 3: Go to “Change Boot Mode Settings”
Inside the Boot Menu, you’ll see several options:
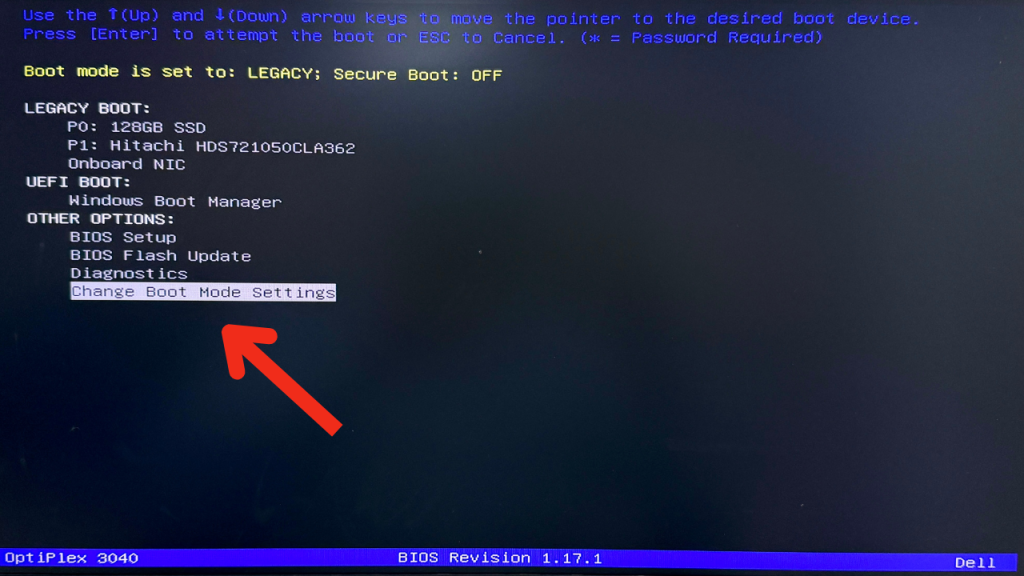
- BIOS Setup
- Diagnostics
- Boot Options
- Change Boot Mode Settings
Select Change Boot Mode Settings.
This section is important because improper boot mode is one of the most common reasons for “couldn’t repair” boot loops
Step 4: Select UEFI Boot and Turn Secure Boot On
Inside Boot Mode Settings:
- Choose UEFI Boot
- Enable Secure Boot ON
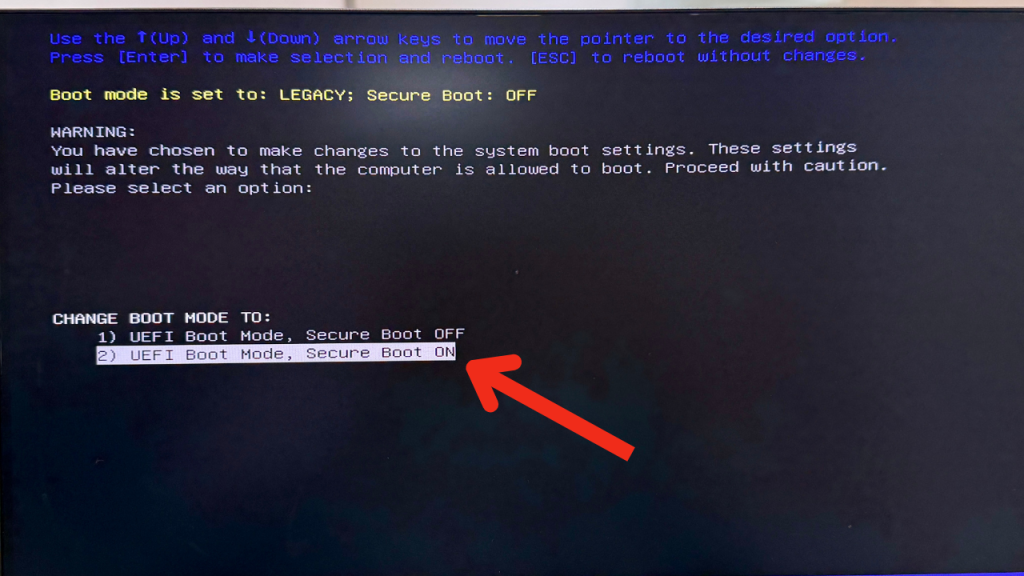
These settings ensure Windows loads using modern boot architecture.
Why these settings matter:
- UEFI supports modern Windows installations
- Secure Boot prevents unauthorized boot files
- Dell systems expect UEFI + Secure Boot by default
Misconfigured settings often cause the blue screen you are trying to fix.
Step 5: Choose YES and Press Enter
When prompted:
Are you sure you want to apply these settings?
Select YES and press Enter.
This confirms your changes.
Step 6: Apply the Changes and Hit Enter Again
After confirming, press:

- Apply Changes
- Then press Enter
Your system will restart.
When it boots again, Windows will attempt to load using correct boot parameters, which helps fix boot and couldn’t repair errors on Windows.
Step 7: Your Computer Should Start Successfully
In most cases, especially with Dell PCs, correcting UEFI and Secure Boot resolves the issue immediately.
If the blue screen no longer appears, the problem was caused by:
- Boot mode corruption
- BIOS reset
- A forced shutdown that changed the boot state
- Windows mismatch between Legacy and UEFI
Your PC should now load normally.
Why UEFI Boot Mode Fixes These Errors
Many new laptops and desktops install Windows using UEFI mode instead of Legacy mode. When BIOS is reset or modified, the PC may try to start in the wrong boot mode.
This causes Windows to say:
- “Automatic Repair couldn’t repair your PC.”
- “Your PC did not start correctly.”
- “Boot device not found.”
Returning to UEFI boot mode re-aligns the system with the correct bootloader, helping you fix boot and couldn’t repair errors on Windows quickly.
Learn more about UEFI from Microsoft (DoFollow):
https://learn.microsoft.com/en-us/windows-hardware/drivers/bringup/uefi
Boot Issues Commonly Seen on Dell PCs
Dell laptops often show this problem due to:
- BIOS updates
- Hard shutdowns
- Mode switching during troubleshooting
- Factory reset attempts
- Boot order corruption
Dell also recommends using UEFI and Secure Boot for proper Windows 10 and 11 operation.
If Your PC Still Shows Boot Errors
If switching to UEFI doesn’t fix the problem, try these:
1. Run Startup Repair
Advanced Options → Troubleshoot → Startup Repair
2. Rebuild Bootloader using CMD
bootrec /fixmbr
bootrec /fixboot
bootrec /rebuildbcd
3. Check disk for corruption
chkdsk /f /r
(Internal link suggestion: /fix-pc-program-files-or-disk-issue)
4. Disconnect external USB drives
Sometimes they confuse the boot order.
5. Reset BIOS to Default
Use “Load Setup Defaults.”
Check out this Video if you have doubts
FAQs About HowFAQs About How to Fix Boot and Couldn’t Repair Errors on Windows to Fix Boot Couldn’t Repair Errors
Why does my PC say it couldn’t repair itself?
Usually because the boot mode is incorrect, the bootloader is corrupted, or system files are damaged.
Does switching to UEFI delete my files?
No. Changing boot mode does not affect your data.
Why does this issue happen mostly on Dell PCs?
Dell systems rely heavily on UEFI and Secure Boot. Any BIOS reset misconfigures this.
What if F12 doesn’t work?
No. Changing boot mode does not affect files.
Will this method fix all boot errors?
Most, but not all. Disk corruption or hardware failure may require additional steps.
Check this out..
Boost Gaming Performance on Windows PC With This Simple Guide