
Introduction
Your Windows PC used to boot up in seconds — now it takes three minutes just to open a browser. Sound familiar? Studies show that a slow PC costs the average worker over 9 hours of lost productivity every month, and most people have no idea how to fix it.
The good news? You do not need to buy a new computer. You just need the right steps to speed up your Windows PC — and that is exactly what this guide delivers.
In this article, you will learn 15 proven, step-by-step methods to make your Windows PC faster. Whether your machine is running Windows 10 or Windows 11, these techniques work for beginners and intermediate users alike. You will discover how to clean up junk files, disable hidden background apps, adjust power settings, and even tweak advanced system options — all for free.
No tech degree required. No expensive software needed. Just clear, honest advice from someone who has fixed thousands of slow PCs.
Let’s start with the most important question of all — why does your PC slow down in the first place?
Table of Contents
1. Why Your Windows PC Slows Down (And How to Fix It)
Understanding the root cause of a slow PC is the first step to fixing it for good. Most people treat the symptoms instead of the real problem, which is why their PC stays slow even after a “cleanup.”
The Top Reasons Your PC Gets Slower Over Time
Your Windows PC slows down for a handful of well-known reasons. Once you know them, every fix in this guide will make perfect sense.
Here are the most common culprits:
- Too many startup programs — Every app you install wants to launch at startup. Over time, this quietly destroys your boot speed.
- A full or fragmented hard drive — When your drive is 85%+ full, Windows struggles to find space to write temporary files, and performance drops sharply.
- Outdated drivers or Windows updates — Microsoft pushes performance patches regularly. Skipping them means you are leaving speed on the table.
- Malware and unwanted background processes — Viruses and bloatware quietly eat your CPU and RAM 24/7.
- Low RAM — If your PC has 4GB of RAM or less, multitasking becomes painful fast.
- Thermal throttling — When your CPU overheats (often due to dust), it automatically slows down to protect itself.
- Wrong power plan — Windows defaults to a balanced or battery-saving power plan, which limits your processor’s full potential.
How to Quickly Diagnose Your PC’s Speed Problem
Before you start applying fixes, spend 60 seconds diagnosing the issue. This saves you hours of trial and error.
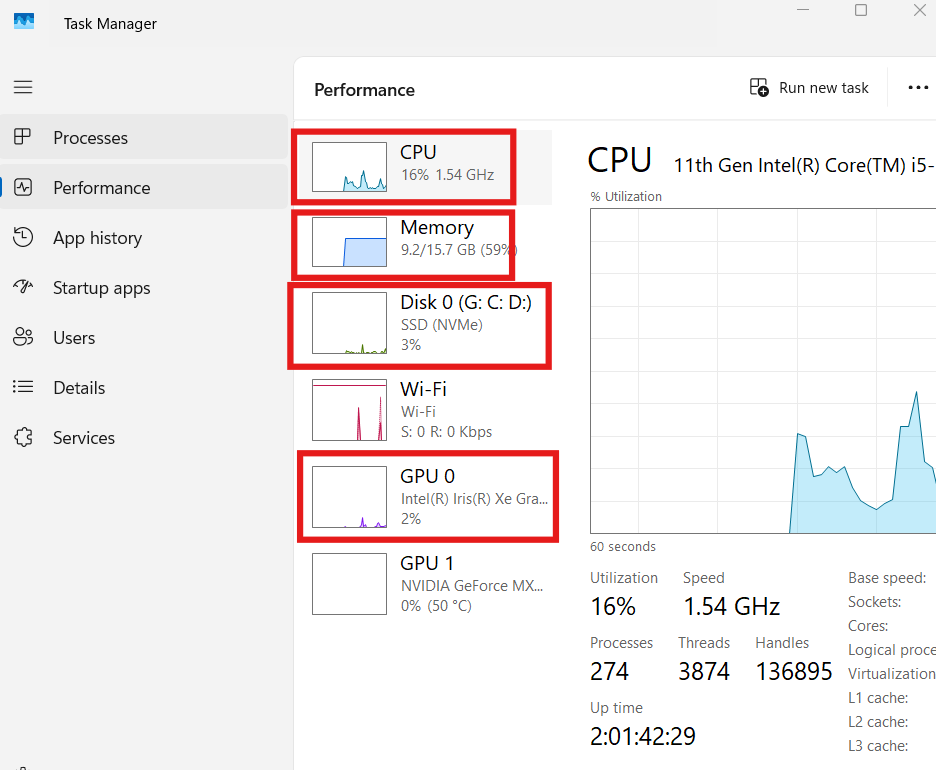
- Press Ctrl + Shift + Esc to open Task Manager.
- Click the Performance tab at the top.
- Look at your CPU, Memory, Disk, and GPU usage.
- If any resource shows above 80% usage while the PC is idle, that is your bottleneck.
- Click the Processes tab to see which specific program is consuming the most resources.
- Write down the top 3 offenders — you will address them in the sections below.
💡 Pro Tip: Save Task Manager as a shortcut on your taskbar. Right-click the taskbar → click the Task Manager icon → “Pin to taskbar.” Now you can open it in one click whenever your PC starts feeling sluggish, catching problems before they get worse.
⚠️ Common Mistake: Most beginners close apps they do not recognize in Task Manager without researching them first. Some processes that look unfamiliar — like svchost.exe or dwm.exe — are critical Windows system files. Closing them can crash your PC. Always Google the process name before ending it.
2. How to Disable Startup Programs to Speed Up Windows PC
Startup programs are one of the biggest hidden reasons your PC boots slowly. Every piece of software you install — Spotify, Discord, Teams, Steam, antivirus — tries to launch itself the moment Windows starts. Within a year of owning a PC, it is common to have 20+ startup programs running in the background, consuming RAM and CPU before you even open a single window.
Disabling unnecessary startup programs is the single fastest way to speed up Windows PC boot times — and it takes under five minutes.
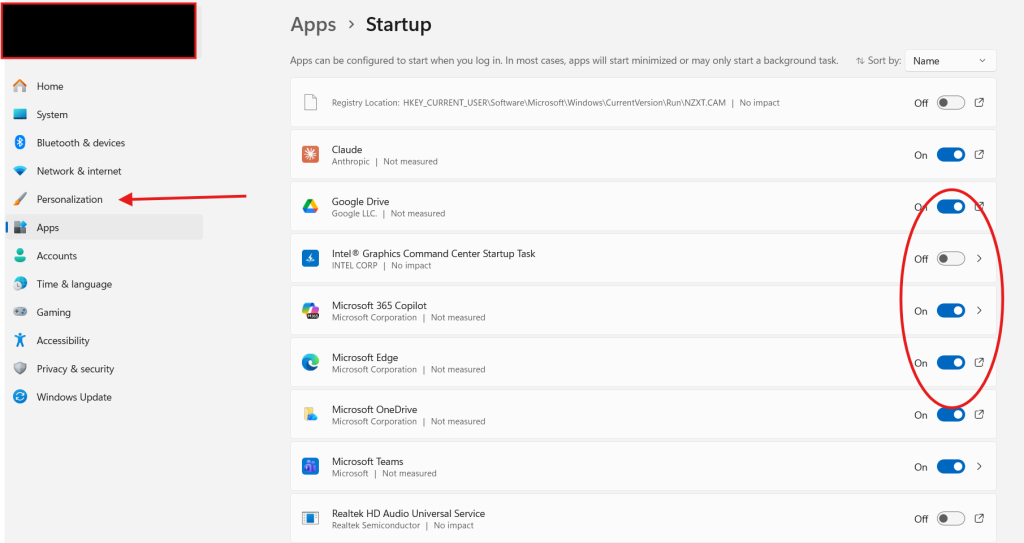
How to Disable Startup Programs in Windows 11
Windows 11 makes this easier than ever with a dedicated Startup Apps section in Settings.
- Press Windows + I to open Settings.
- Click Apps in the left sidebar.
- Scroll down and click Startup.
- You will see a list of all apps with a toggle and an impact rating (Low, Medium, High).
- Sort by Startup Impact — focus on apps marked “High” first.
- Toggle OFF every app you do not need at startup. Common safe ones to disable: Spotify, Discord, Teams (if you do not use it daily), Steam, OneDrive (optional), Skype.
- Do NOT disable your antivirus, audio drivers, or GPU software (like NVIDIA or AMD).
- Restart your PC and measure the difference.
How to Disable Startup Programs in Windows 10
The process is nearly identical in Windows 10, just reached differently.
- Press Ctrl + Shift + Esc to open Task Manager.
- Click the Startup tab at the top.
- Right-click any app with a High startup impact.
- Select Disable.
- Repeat for all non-essential high-impact apps.
- Restart your PC.
Pro results: Disabling 5–10 startup programs can cut your boot time by 30–60 seconds on an average machine. On older PCs with HDDs, the improvement can be even more dramatic.
💡 Pro Tip: After disabling startup programs, use the free tool Autoruns by Microsoft Sysinternals for a far deeper view of everything that runs at startup — including hidden browser extensions, scheduled tasks, and drivers. It shows you items Task Manager does not even reveal. Download it free directly from Microsoft’s official website.
⚠️ Common Mistake: Many beginners disable everything they do not recognize — including things like Realtek HD Audio Manager or NVIDIA Display Container. Disabling these can break your audio or graphics. Stick to consumer apps (Spotify, Discord, Teams, etc.) and research anything you are unsure about.
Read full speed guide
3. Clean Up Your Hard Drive for Maximum Windows Performance
A cluttered hard drive does not just waste storage space — it actively makes your Windows PC slower. When your drive is over 85% full, Windows cannot effectively create virtual memory swap files, and read/write speeds drop noticeably. Cleaning your drive is one of the most impactful free fixes available.
How to Use Windows Disk Cleanup
Windows includes a built-in tool that most people forget exists. Disk Cleanup can safely remove gigabytes of junk in minutes.
- Press Windows + S and type Disk Cleanup, then press Enter.
- Select your C: drive (your main Windows drive) and click OK.
- Wait for Windows to calculate how much space you can free up.
- Check ALL boxes in the list — these are safe to delete: Temporary Internet Files, Recycle Bin, Temporary Files, System Error Memory Dump Files, Thumbnails.
- Click Clean up system files at the bottom for an even deeper clean.
- Re-select your C: drive, check all boxes again (you will now see more options including Windows Update Cleanup).
- Click OK, then Delete Files to confirm.
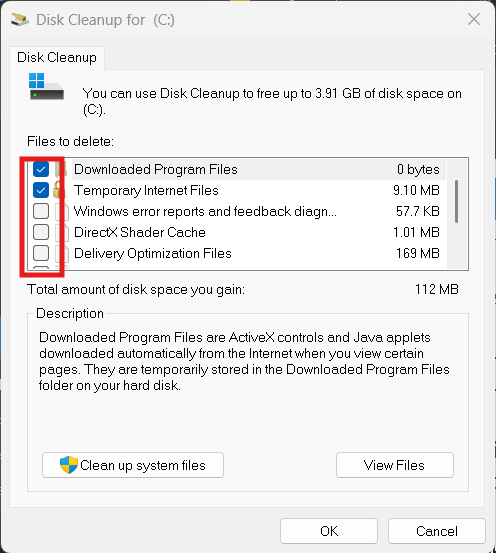
On a typical PC that has not been cleaned in 6–12 months, this process frees up 2–10 GB of space or more.
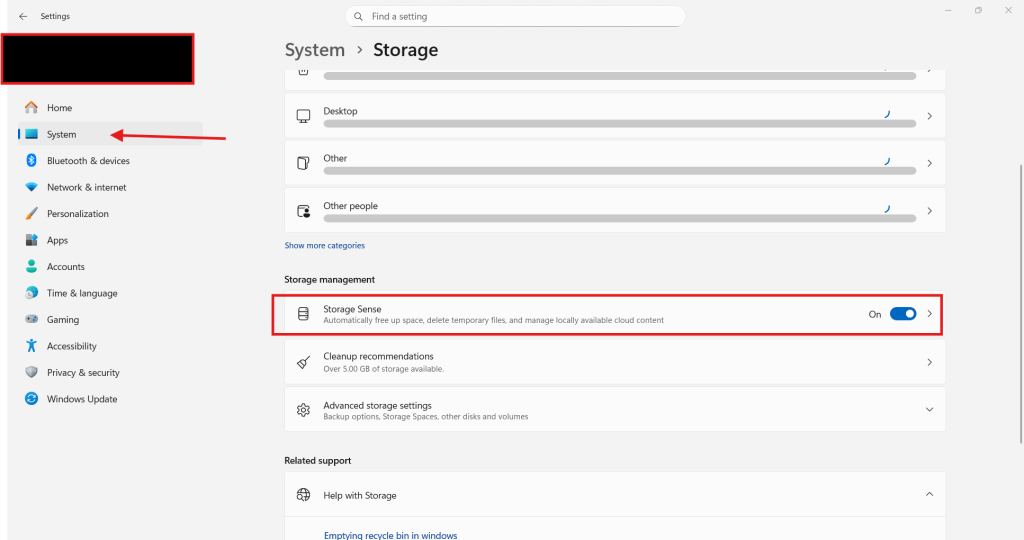
How to Use Storage Sense (Windows 10 & 11 Automatic Cleanup)
Storage Sense is Windows’ automatic cleanup tool that runs in the background so your drive never gets overfull again.
- Press Windows + I to open Settings.
- Go to System → Storage.
- Toggle Storage Sense to On.
- Click Configure Storage Sense or run it now.
- Set it to run every month (or every week on smaller drives).
- Enable Delete temporary files that my apps aren’t using and set the Recycle Bin to auto-empty files older than 30 days.
- Scroll down and click Run Storage Sense now for an immediate clean.
How to Find and Delete Large Hidden Files
Sometimes a single folder hides dozens of gigabytes of forgotten files. Here is how to find them.
- Open File Explorer (Windows + E).
- Click This PC in the sidebar.
- Right-click your C: drive → select Properties.
- Click the Disk Cleanup button for a quick view, OR use WinDirStat (free download) for a visual map of every large file on your drive.
- Look for large folders in Downloads, Desktop, and Videos — these are common culprits.
- Delete anything you no longer need and empty the Recycle Bin when done.
💡 Pro Tip: Your Windows.old folder (found in C:) can take up 15–30 GB after a major Windows upgrade. It is completely safe to delete after 30 days. Run Disk Cleanup → Clean up system files → check Previous Windows installation(s) to remove it in one click.
⚠️ Common Mistake: Never manually delete files from C:\Windows\System32 or C:\Program Files in an attempt to free up space. Deleting system files will corrupt Windows and may force a complete reinstall. Only use Disk Cleanup, Storage Sense, or trusted third-party tools for safe deletion.
4. Adjust Power Settings to Make Your PC Faster
This is one of the most overlooked fixes to speed up your Windows PC — and it takes less than 30 seconds. By default, Windows uses a Balanced power plan, which intentionally throttles your CPU to save electricity. Switching to High Performance mode unlocks your processor’s full potential instantly.
How to Switch to High Performance Power Plan
This fix is especially impactful on laptops and on desktops that were set up without customization.
- Press Windows + S and search for Control Panel, then open it.
- Click Hardware and Sound.
- Click Power Options.
- You will see your current plan (likely “Balanced”). Click the circle next to High Performance.
- If you do not see High Performance, click Show additional plans to reveal it.
- Close the window — the change takes effect immediately. No restart needed.
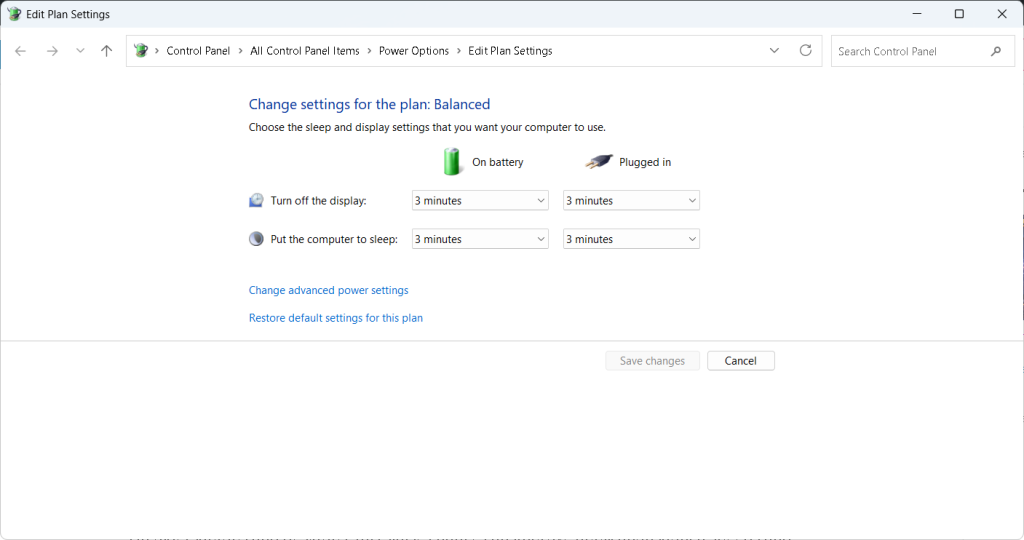
On older laptops and desktops, this single change can improve application launch speeds and gaming frame rates by 10–20% or more.
How to Enable Ultimate Performance Mode (Windows 10 & 11 Pro/Enterprise)
Windows hides an even more aggressive power plan called Ultimate Performance mode. Here is how to unlock it.
- Press Windows + X and click Windows Terminal (Admin) or Command Prompt (Admin).
- Type the following command exactly and press Enter:
powercfg -duplicatescheme e9a42b02-d5df-448d-aa00-03f14749eb61- Open Control Panel → Power Options again.
- You will now see Ultimate Performance as a new plan. Select it.
- This mode disables all micro-power-saving delays, giving your hardware maximum responsiveness at all times.
Note: Ultimate Performance uses slightly more electricity. On a desktop PC plugged into the wall, this is a non-issue. On a laptop, only use it when plugged in.
💡 Pro Tip: On Windows 11, Microsoft introduced a Power Mode slider under Settings → System → Power & Battery. Set this to Best Performance. This is the quickest route on Windows 11 without touching Control Panel at all.
⚠️ Common Mistake: Beginners sometimes leave their laptop on Power Saver mode indefinitely — even when it is plugged into the wall. Power Saver mode cuts CPU performance by up to 50% to preserve battery. Always switch to Balanced or High Performance when plugged in.
5. Update Windows and Drivers to Optimize Your PC
Skipping Windows updates is one of the most common mistakes that keeps your PC running slow. Microsoft regularly releases performance patches, security fixes, and driver optimizations that directly impact how fast your system runs. Outdated drivers — especially your GPU, chipset, and storage drivers — can cause stuttering, freezing, and slowdowns that no amount of cleaning will fix.
Keeping Windows and your drivers current is not optional. It is essential maintenance.
How to Check for and Install Windows Updates
Most people set Windows Update to automatic and forget about it. However, updates sometimes pause silently, leaving your system weeks or months behind. Here is how to check manually.
- Press Windows + I to open Settings.
- Click Windows Update (bottom of the left sidebar in Windows 11, or a separate tab in Windows 10).
- Click Check for updates.
- If updates are available, click Download and Install All.
- Pay special attention to Optional Updates — click “View optional updates” and install any driver updates listed there.
- Restart your PC when prompted. Do not skip this step — many updates only apply after a full restart.
- Run Check for updates a second time after restarting. Sometimes a second batch of updates unlocks only after the first round installs.
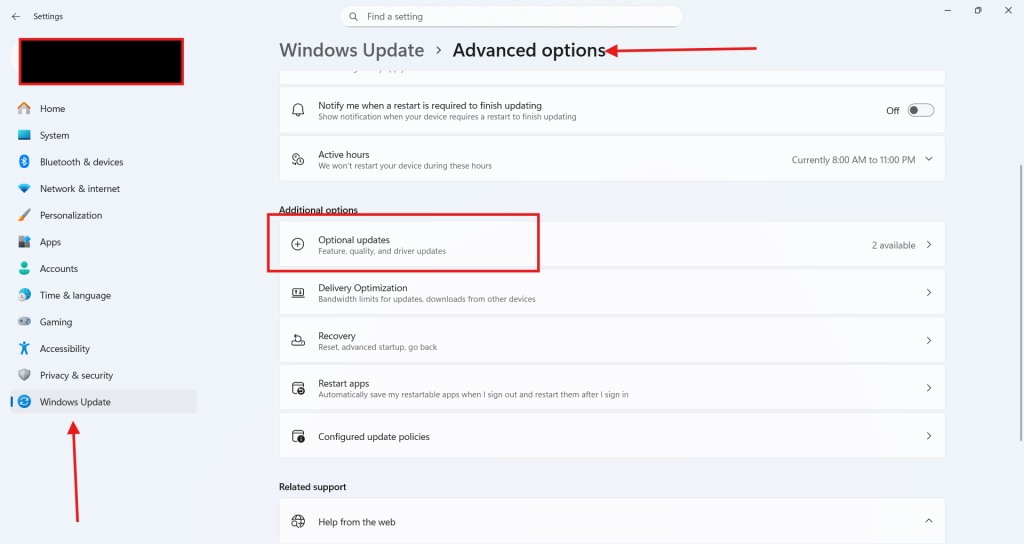
Why this matters for speed: Windows 10 and 11 both received major performance patches in 2024–2026 that improved SSD handling, memory compression, and CPU scheduling. Running an outdated version means you are missing real speed gains.
How to Update Your GPU, Chipset, and Storage Drivers
Driver updates are separate from Windows updates, and they make a significant difference — especially for gaming, video editing, and general responsiveness.
For NVIDIA GPU drivers:
- Right-click your desktop → click NVIDIA Control Panel (or visit nvidia.com/drivers).
- Click Help → Updates to check for new driver versions.
- Download and install the latest Game Ready Driver or Studio Driver depending on your use case.
For AMD GPU drivers:
- Download AMD Software: Adrenalin Edition from amd.com.
- Open it and click Check for Updates.
- Install any available driver updates.
For Intel/AMD Chipset and Storage drivers:
- Visit your motherboard manufacturer’s website (ASUS, MSI, Gigabyte, etc.).
- Find your specific motherboard model under “Support” or “Drivers.”
- Download and install the latest Chipset, LAN, Audio, and Storage drivers.
Alternatively, use Driver Easy (free version available) or Snappy Driver Installer to scan your entire system for outdated drivers in one pass.
💡 Pro Tip: After a major Windows feature update (like the Windows 11 24H2 update), always update your GPU driver within 48 hours. Microsoft and GPU manufacturers coordinate driver releases with major Windows updates, and the new driver almost always fixes compatibility slowdowns introduced by the OS upgrade.
⚠️ Common Mistake: Many users download driver updates from random third-party “driver updater, websites that bundle adware or install the wrong drivers. Always download GPU drivers directly from nvidia.com or amd.com, and chipset drivers directly from your motherboard manufacturer’s official website. Never trust a pop-up that says “Your drivers are outdated — click here.
6. Manage Background Processes to Fix a Slow Computer
Even when you are not actively using apps, your computer is busy. Background processes — including telemetry services, cloud sync tools, antivirus scans, and update checkers — quietly consume RAM and CPU around the clock. Managing these processes is a key step to speed up your Windows PC without spending a single dollar.
The goal is not to disable everything. The goal is to identify which background processes are genuinely useful versus which ones are silently wasting your system resources.
How to Identify and End Resource-Hungry Background Processes
Task Manager is your best weapon here. Use it to find and stop processes that are hogging your system.
- Press Ctrl + Shift + Esc to open Task Manager.
- Click the Processes tab.
- Click the CPU column header to sort by CPU usage from highest to lowest.
- Look for any non-system app consuming more than 5–10% CPU while idle.
- Common offenders: antivirus real-time scans, Windows Search indexing, OneDrive sync, browser background tasks, Adobe Update Helper, iTunes Helper.
- To stop a process temporarily, right-click it and select End Task.
- Note: ending a task only stops it until the next restart. For a permanent fix, you need to disable the program from startup or uninstall it.
How to Disable Unnecessary Windows Services
Windows runs dozens of background services — many of which the average user never needs. Disabling the right ones can noticeably reduce idle CPU and RAM usage.
- Press Windows + R, type
services.msc, and press Enter. - The Services window opens. This shows every Windows background service.
- Look for these services that are commonly safe to disable for home users:
- Windows Search (if you rarely use the search bar) — right-click → Properties → set Startup Type to Disabled
- Print Spooler (if you have no printer) — set to Disabled
- Fax (if you do not use fax) — set to Disabled
- Connected User Experiences and Telemetry (Microsoft’s data collection service) — set to Disabled
- Windows Error Reporting Service — set to Disabled
- For each service: right-click → Properties → change Startup Type to Disabled → click Stop → click OK.
- Restart your PC after making changes.
Important: Do not disable services you are unsure about. Services like Windows Audio, DHCP Client, DNS Client, and Security Center are critical. Research before disabling.
How to Limit OneDrive and Cloud Sync Background Activity
Cloud sync tools like OneDrive, Google Drive, and Dropbox can quietly saturate your disk and CPU during syncing — especially right after startup.
- Right-click the OneDrive icon in your system tray (bottom right).
- Click the gear icon → Settings.
- Go to the Sync and backup tab.
- Under Improve upload speed, reduce the upload speed limit — or pause sync entirely during work hours.
- In the Account tab, click Choose folders to sync only essential folders instead of your entire PC.
For Google Drive and Dropbox, use the same approach — open settings, reduce sync frequency, and limit which folders sync automatically.
💡 Pro Tip: Use the free tool Process Hacker 2 (or its successor System Informer) instead of Task Manager for deeper insight into background processes. It shows you hidden processes, real-time network usage per process, and memory details that standard Task Manager hides. It is completely safe and trusted by IT professionals worldwide.
⚠️ Common Mistake: A very common beginner error is disabling Windows Defender (Microsoft Defender Antivirus) to “speed up” the PC. While Defender does use resources during scans, it is your primary protection against malware — the very thing that causes the most dramatic slowdowns. Instead of disabling it, schedule Defender’s full scans for nighttime when you are not using your PC: Windows Security → Virus & Threat Protection → Manage Settings → Schedule a scan.
7. Upgrade Your RAM and Storage for Serious Speed Gains
Sometimes software tweaks only get you so far. If your PC has 4GB of RAM or less, or still runs on an old mechanical HDD (hard disk drive), no amount of settings optimization will make it feel truly fast. Hardware upgrades deliver the most dramatic speed improvements — and in 2026, they are more affordable than ever.
This section covers the two upgrades that give you the best bang for your money.
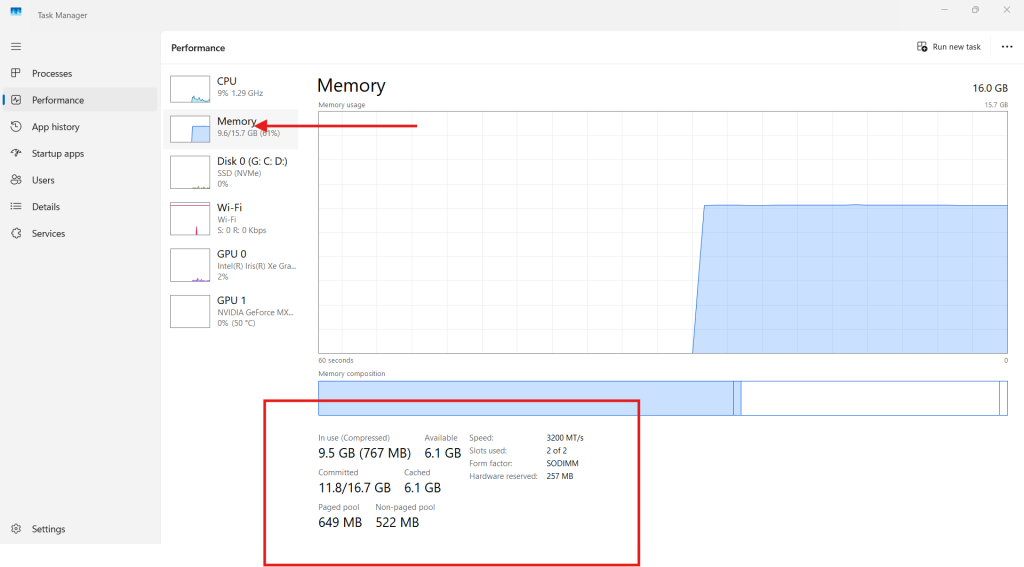
How to Check If You Need More RAM
Before spending money on RAM, confirm that your current RAM is actually the bottleneck.
- Open Task Manager (Ctrl + Shift + Esc).
- Click the Performance tab.
- Click Memory in the left panel.
- Look at the In Use and Available numbers.
- If “In Use” is above 85% of your total RAM while performing normal tasks, you need more RAM.
- Also check Slots Used at the bottom — for example, “2 of 4” means 2 RAM slots are used and 2 are free for expansion.
How much RAM do you actually need in 2026?
- 8GB — Minimum for Windows 11 and basic multitasking.
- 16GB — The sweet spot for most users. Comfortable for browsing, office work, and light gaming.
- 32GB — Ideal for video editors, developers, streamers, or heavy multitaskers.
How to Upgrade from HDD to SSD (The Biggest Upgrade You Can Make)
If your PC still runs on a spinning hard drive, upgrading to an SSD (Solid State Drive) is the single most transformative speed upgrade possible. Boot times go from 2–3 minutes to under 20 seconds. App load times drop by 5–10x. It feels like a brand-new machine.
Step 1 — Choose the right SSD:
- For most desktops and older laptops: a SATA SSD (like Samsung 870 EVO or Crucial MX500) — affordable and easy to install.
- For newer laptops and desktops with an M.2 slot: an NVMe SSD (like Samsung 980 or WD Black SN850X) — significantly faster than SATA.
- Recommended size: 500GB minimum — storage is cheap in 2026.
Step 2 — Clone your existing drive (No reinstall needed):
- Download Macrium Reflect Free (macrium.com) — a trusted, free cloning tool.
- Connect your new SSD via a USB-to-SATA adapter or install it in your PC.
- In Macrium Reflect, click Clone this disk.
- Select your current HDD as the source and your new SSD as the destination.
- Click Finish and let the process run (30–90 minutes depending on data size).
- Shut down, swap the drives (or set SSD as the primary boot drive in BIOS), and boot up.
Your PC will start from the SSD with all your files, apps, and settings intact — no reinstall needed.
💡 Pro Tip: After installing an SSD, confirm that TRIM is enabled. TRIM keeps your SSD running at peak speed long-term. Open Command Prompt as Administrator and type: fsutil behavior query DisableDeleteNotify. If it returns 0, TRIM is active and you are all good. If it returns 1, run fsutil behavior set DisableDeleteNotify 0 to enable it.
⚠️ Common Mistake: Many people buy the cheapest SSD they can find and end up with a slow, low-quality drive that fails within a year. Stick to trusted brands: Samsung, WD (Western Digital), Crucial, Seagate, or Kingston. Avoid no-brand SSDs from unknown sellers — especially on discount marketplace sites. Your data is worth the extra $10–$20.
8. Use Windows Built-In Tools to Speed Up Your Windows PC
Windows ships with a powerful set of built-in optimization tools that most users never touch. These tools are free, safe, and often more effective than third-party “PC cleaner” software that bombards you with upsell pop-ups. This section walks you through the most valuable ones.
How to Run the System File Checker (SFC) and DISM
Corrupted system files are a hidden cause of Windows slowdowns, random crashes, and error messages. Windows has two powerful repair tools built right in — SFC (System File Checker) and DISM (Deployment Image Servicing and Management).
Run SFC first:
- Press Windows + X and click Windows Terminal (Admin) or Command Prompt (Admin).
- Type the following command and press Enter:
sfc /scannow- Windows will scan all protected system files and automatically replace any corrupted ones.
- The scan takes 5–15 minutes. Do not close the window.
- When finished, you will see one of three messages:
- “Windows Resource Protection did not find any integrity violations.” → Your system files are clean.
- “Windows Resource Protection found corrupt files and successfully repaired them.” → Corruption fixed.
- “Windows Resource Protection found corrupt files but was unable to fix some of them.” → Run DISM next.
Run DISM if SFC finds unfixable corruption:
- In the same Admin terminal, type:
DISM /Online /Cleanup-Image /RestoreHealth- This connects to Windows Update servers to download clean replacement files.
- The process takes 10–30 minutes. Ensure you are connected to the internet.
- After DISM completes, run
sfc /scannowone more time to verify all files are repaired.
How to Use Defragment and Optimize Drives
Defragmentation reorganizes fragmented data on HDDs so Windows can read files faster. On SSDs, Windows runs optimization instead (not traditional defrag, which would damage an SSD).
- Press Windows + S and search for Defragment and Optimize Drives, then open it.
- Select your C: drive and click Analyze.
- If fragmentation is above 10% on an HDD, click Optimize to defragment.
- For SSDs, the tool will show “Solid State Drive” as the media type. Click Optimize — Windows will run a TRIM pass instead of defrag, which is correct and safe.
- Click Change settings to enable Automatic optimization on a weekly schedule.
Note: Never manually defragment an SSD. Windows handles SSD optimization automatically with scheduled TRIM — running manual defrag on an SSD wastes write cycles and shortens its lifespan.
How to Run Windows Memory Diagnostic
Faulty RAM causes freezing, blue screens, and unexplained slowdowns. Windows Memory Diagnostic tests your RAM for errors.
- Press Windows + S and search Windows Memory Diagnostic, then open it.
- Click Restart now and check for problems.
- Your PC will restart and run a memory test (takes 5–20 minutes).
- After completing, Windows restarts again and logs the results.
- To view results: press Windows + X → Event Viewer → Windows Logs → System → search for an event from “MemoryDiagnostics-Results.”
- If it reports errors, one or more of your RAM sticks may be faulty and need replacement.
💡 Pro Tip: Run both SFC and DISM every 3–6 months as preventative maintenance — even if your PC seems fine. Corruption from sudden shutdowns, power surges, or failed updates accumulates silently over time. Catching it early prevents random crashes and slowdowns before they impact your productivity.
⚠️ Common Mistake: Many beginners run defragmentation on an SSD, believing it will make it faster. This is a harmful myth. Defragmenting an SSD does not improve speed — it unnecessarily writes to the drive, consuming write cycles and reducing the SSD’s total lifespan. Windows knows the difference and handles SSDs correctly through scheduled optimization. Trust the built-in tool and leave SSD defrag alone.
9. Advanced Registry and Visual Effects Tweaks to Speed Up Your Windows PC
You have handled the basics. Now it is time to go deeper. These advanced tweaks target the visual overhead and registry settings that quietly drain performance in the background. None of these steps require paid software — just careful attention to detail.
How to Reduce Visual Effects for Faster Performance
Windows 11 and Windows 10 both load up beautiful animations, transparency effects, and shadows by default. These look great on high-end machines, but on mid-range or older PCs, they consume measurable GPU and CPU resources. Turning them off delivers a noticeably snappier feel — especially when opening windows, switching apps, and scrolling.
- Press Windows + R, type
sysdm.cpl, and press Enter to open System Properties. - Click the Advanced tab.
- Under Performance, click Settings.
- The Performance Options window opens. You will see three options at the top:
- Let Windows choose what’s best for my computer (default)
- Adjust for best appearance (maximum visual effects — slowest)
- Adjust for best performance (all effects OFF — fastest)
- Custom (pick and choose — recommended)
- Select Custom and uncheck these specific effects for the best balance of speed and usability:
- ☐ Animate controls and elements inside windows
- ☐ Animate windows when minimizing and maximizing
- ☐ Animations in the taskbar
- ☐ Fade or slide menus into view
- ☐ Fade or slide ToolTips into view
- ☐ Fade out menu items after clicking
- ☐ Show shadows under mouse pointer
- ☐ Slide open combo boxes
- Keep these ON for usability:
- ✅ Show thumbnails instead of icons
- ✅ Smooth edges of screen fonts
- ✅ Show window contents while dragging
- Click Apply, then OK.
The change is immediate — no restart required. Your Windows interface will feel noticeably more responsive, especially on laptops with integrated graphics.
How to Tweak the Windows Registry for Extra Speed
The Windows Registry stores low-level system settings that control how Windows behaves at a deep level. Two specific registry tweaks are well-known, safe, and genuinely effective at improving responsiveness. Follow these steps carefully — registry edits require precision.
⚠️ Always back up your registry before editing it:
- Press Windows + R, type
regedit, and press Enter. - In Registry Editor, click File → Export.
- Name the file “Registry Backup [today’s date]” and save it to your Desktop.
- Now you have a restore point if anything goes wrong.
Tweak 1 — Speed up the Start Menu and Taskbar: This tweak reduces the delay Windows adds before displaying menus, making everything feel snappier.
- In Registry Editor, navigate to:
HKEY_CURRENT_USER\Control Panel\Desktop- Find the value named MenuShowDelay in the right panel.
- Double-click it. Change the value from 400 to 0 (zero).
- Click OK.
This removes the 400ms artificial delay Windows adds before showing menus. You will feel the difference immediately after restarting.
Tweak 2 — Speed up Shutdown Time: Windows waits a long time for background processes to close before shutting down. This tweak cuts that wait significantly.
- In Registry Editor, navigate to:
HKEY_LOCAL_MACHINE\SYSTEM\CurrentControlSet\Control- Find WaitToKillServiceTimeout in the right panel.
- Double-click it. Change the value from 5000 (5 seconds) to 2000 (2 seconds).
- Click OK.
- Navigate to:
HKEY_CURRENT_USER\Control Panel\Desktop- Find WaitToKillAppTimeout. Change its value from 20000 to 5000.
- Click OK, then close Registry Editor.
- Restart your PC for changes to take full effect.
Result: Your PC will shut down significantly faster, and menus will open with zero delay.
How to Disable Transparency Effects and Animation in Windows 11
Windows 11’s frosted glass transparency effects look polished, but they tax your GPU constantly. Disabling them is a quick win — especially on laptops with integrated graphics.
- Press Windows + I to open Settings.
- Go to Personalization → Colors.
- Scroll down and toggle Transparency effects to OFF.
- Next, go to Accessibility → Visual Effects.
- Toggle Animation effects to OFF.
- Toggle Always show scrollbars to ON — this improves navigation usability.
These three toggles combined reduce the GPU load during normal desktop use and make window interactions feel crisper.
💡 Pro Tip: After disabling animations, go one step further and disable Mica and Acrylic material effects by switching your Windows personalization theme to a solid color background instead of a wallpaper. Windows renders dynamic backgrounds and blur effects even when you are not looking at the desktop. A solid color background reduces this background rendering overhead by a measurable amount on lower-end hardware.
⚠️ Common Mistake: Some users find aggressive “registry cleaner” software online and run it to “speed up” their PC. Tools like CCleaner’s registry cleaner, WinOptimizer, and dozens of similar apps aggressively delete registry entries — often ones that are still actively needed. This can cause application crashes, missing shortcut errors, and in rare cases, broken Windows installs. The manual registry tweaks above are proven safe. Automated registry cleaners are not worth the risk.
10. Remove Bloatware and Unnecessary Programs to Speed Up Your Windows PC
Bloatware is pre-installed software that came with your PC and serves no purpose for you — yet it runs quietly in the background, consuming RAM, CPU, and storage. New Windows PCs from brands like Dell, HP, Lenovo, and ASUS often ship with 15–30 unwanted programs already installed. Removing them is free, safe, and delivers immediate performance gains.
How to Uninstall Unwanted Programs in Windows 10 and 11
Uninstalling bloatware is straightforward once you know where to look. Work through this list methodically.
- Press Windows + I to open Settings.
- Go to Apps → Installed Apps (Windows 11) or Apps → Apps & Features (Windows 10).
- Click the Sort by dropdown and select Size — this shows the largest apps first.
- Scroll through the list and identify apps you never use.
- Common bloatware safe to uninstall:
- McAfee or Norton trial antivirus (replace with free Windows Defender)
- Candy Crush, Disney+, Netflix shortcuts (pre-installed store apps)
- WildTangent Games or any trial game launcher
- Manufacturer companion apps (Dell SupportAssist, HP Support Solutions, Lenovo Vantage — optional)
- Microsoft Office trial if you use a free alternative
- Click the three-dot menu next to each unwanted app → click Uninstall.
- Follow any uninstaller prompts and repeat for every unnecessary program.
- Restart your PC when finished.
How to Remove Built-In Windows Store Apps (UWP Bloatware)
Some Microsoft pre-installed apps cannot be uninstalled through Settings but can be removed via PowerShell. These include Cortana (standalone app), mixed reality portal, and others.
- Right-click the Start button and select Windows Terminal (Admin) or PowerShell (Admin).
- To remove a specific app, use this command format:
Get-AppxPackage *appname* | Remove-AppxPackage- Replace
appnamewith the relevant keyword. Common examples:- Remove Cortana:
Get-AppxPackage *Microsoft.549981C3F5F10* | Remove-AppxPackage - Remove Mixed Reality Portal:
Get-AppxPackage *holographic* | Remove-AppxPackage - Remove 3D Viewer:
Get-AppxPackage *Microsoft.Microsoft3DViewer* | Remove-AppxPackage
- Remove Cortana:
- Alternatively, use the free tool BloatyNosy or Bulk Crap Uninstaller — both are safe, open-source, and designed specifically for Windows bloatware removal.
How to Use Revo Uninstaller for a Deeper Clean
Standard Windows uninstall leaves behind leftover files, folders, and registry entries. Revo Uninstaller Free removes the app AND its leftovers in one pass.
- Download Revo Uninstaller Free from revouninstaller.com (official site only).
- Open Revo and select the program you want to remove.
- Click Uninstall and choose Moderate scan mode.
- Revo runs the standard uninstaller first, then scans for and removes all leftover traces.
- Confirm deletion of all found leftovers and repeat for each bloatware program.
💡 Pro Tip: Use the free tool Should I Remove It? (shouldiremoveit.com) to quickly research any program you are unsure about. Enter the program name and it shows a community-based removal percentage — if 70%+ of users removed it, it is almost certainly safe bloatware. This removes all guesswork from the uninstall process.
⚠️ Common Mistake: Many beginners uninstall manufacturer driver utilities like Intel Driver Support Assistant, AMD Software, or Realtek Audio Console thinking they are bloatware. These apps manage critical hardware drivers. Removing them without first updating your drivers through Device Manager can leave you without sound, graphics, or Wi-Fi. Research before you uninstall.
11. Scan and Remove Malware to Fix a Slow Windows Computer
Malware is one of the most overlooked causes of a persistently slow Windows PC. Viruses, adware, spyware, and cryptominers silently run in the background — consuming 30–80% of your CPU and RAM 24 hours a day. If your PC slows down after browsing certain websites, downloading free software, or clicking email attachments, malware is almost certainly involved.
Cleaning malware is non-negotiable before any other speed fix will hold long-term.
How to Run a Full Scan with Windows Defender
Windows Defender (Microsoft Defender Antivirus) is fully capable of catching and removing most malware — and it is already built into Windows for free.
- Press Windows + S and search for Windows Security, then open it.
- Click Virus & Threat Protection.
- Under Quick Scan, click the dropdown arrow and select Full Scan instead.
- Click Scan Now.
- A full scan checks every file on your system and takes 30–90 minutes depending on drive size.
- If threats are found, click Start Actions to quarantine or remove them automatically.
- Restart your PC after the scan completes.
Schedule automatic full scans for overnight: go to Virus & Threat Protection → Manage Settings → Automatic Sample Submission to ensure Defender always has the latest threat data.
How to Run Malwarebytes as a Second Opinion Scanner
Windows Defender misses some adware and potentially unwanted programs (PUPs) that Malwarebytes catches. Always run both for a thorough clean.
- Download Malwarebytes Free from malwarebytes.com (official site only).
- Install and open Malwarebytes.
- Click Scan on the home screen.
- Malwarebytes runs a Threat Scan covering memory, startup items, registry, and files.
- The scan takes 5–15 minutes.
- Review the results — quarantine everything flagged as Malware or PUP (Potentially Unwanted Program).
- Click Quarantine, then Restart Now to complete removal.
Malwarebytes Free does not run in real-time — use it as a monthly on-demand second opinion scanner alongside Defender’s real-time protection.
💡 Pro Tip: After removing malware, reset all your browsers to clear any adware extensions or hijacked settings. In Chrome: Settings → Reset and clean up → Restore settings to their original defaults. In Edge: Settings → Reset Settings → Restore settings to their default values. Many adware programs survive a malware scan because they live inside the browser rather than Windows itself.
⚠️ Common Mistake: Never run two real-time antivirus programs simultaneously — for example, Windows Defender AND McAfee active at the same time. They will conflict with each other, flag each other’s processes as threats, and paradoxically make your PC dramatically slower. Use one real-time antivirus (Defender is excellent) and use Malwarebytes only as an on-demand scanner.
12. Optimize Your Web Browser for Faster Windows Performance {#browser-optimize}
Your web browser is one of the most resource-hungry applications on your PC — and most people use it all day. Chrome, Edge, and Firefox are all known to consume enormous amounts of RAM when loaded with extensions, open tabs, and cached data. Optimizing your browser directly translates to a faster, more responsive Windows experience because it frees up RAM and CPU for everything else.
How to Clear Browser Cache, Cookies, and History
A bloated browser cache can slow down page loading and consume gigabytes of storage. Clearing it regularly keeps your browser snappy.
For Google Chrome:
- Open Chrome and press Ctrl + Shift + Delete.
- Set the Time range to All time.
- Check: Browsing history, Cookies and other site data, Cached images and files.
- Click Delete data.
- Restart Chrome.
For Microsoft Edge:
- Open Edge and press Ctrl + Shift + Delete.
- Set Time range to All time.
- Check all three main categories.
- Click Clear now and restart Edge.
For Firefox:
- Open Firefox → click the hamburger menu (≡) → Settings.
- Go to Privacy & Security.
- Under Cookies and Site Data, click Clear Data.
- Under History, click Clear History → set to Everything.
- Restart Firefox.
How to Manage and Remove Browser Extensions
Extensions are the number one hidden cause of browser slowdowns. Each extension runs background code, tracks web activity, and consumes RAM. Many users install extensions and forget about them — accumulating 10, 20, or 30 active extensions over time.
Audit your Chrome extensions:
- Open Chrome → type
chrome://extensionsin the address bar → press Enter. - Review every installed extension.
- Toggle OFF any extension you do not actively use.
- Click Remove on extensions you do not recognize or no longer need.
- Keep only essential extensions — password manager, ad blocker, and perhaps one productivity tool.
Apply the same audit in Edge (edge://extensions) and Firefox (hamburger menu → Add-ons and Themes → Extensions).
Target these common RAM-heavy extension types for removal:
- Shopping coupon auto-finders (Honey, Capital One Shopping)
- Multiple ad blockers running simultaneously
- Tab manager extensions with cloud sync
- Screen capture tools you rarely use
How to Enable Hardware Acceleration in Your Browser
Hardware acceleration offloads visual rendering from your CPU to your GPU, making web browsing significantly smoother — especially on video-heavy sites.
Enable in Chrome:
- Open Chrome → Settings → search “hardware acceleration.”
- Toggle Use graphics acceleration when available to ON.
- Click Relaunch.
Enable in Edge:
- Open Edge → Settings → System and Performance.
- Toggle Use hardware acceleration when available to ON.
- Click Restart.
💡 Pro Tip: Switch to Microsoft Edge if you are currently using Chrome. In independent 2025 benchmarks, Edge consistently uses 20–30% less RAM than Chrome while offering identical compatibility. Edge is built on the same Chromium engine as Chrome — meaning all your Chrome extensions work in Edge — but Microsoft has invested heavily in memory optimization that Chrome has not matched. The switch costs nothing and the RAM savings are real.
⚠️ Common Mistake: Many users pin dozens of tabs permanently open in their browser — sometimes 30, 40, or 50 tabs at once. Each open tab consumes between 50MB and 300MB of RAM depending on the page. Fifty open tabs can easily consume 5–10GB of RAM, leaving almost nothing for Windows and other apps. Use a bookmarking system or a “reading list” feature to save pages you want to revisit — and close what you are not actively using.
13. Adjust Virtual Memory and Page File Settings
Virtual memory — also called the page file — is a portion of your hard drive that Windows uses as overflow RAM when your physical RAM runs out. By default, Windows manages the page file automatically, but on systems with low RAM or slow HDDs, the default settings can create bottlenecks. Manually optimizing the page file is a legitimate speed tweak that system administrators and power users rely on.
How to Check and Configure Virtual Memory in Windows
Before adjusting anything, check your current page file settings and understand what Windows is doing with virtual memory.
- Press Windows + R, type
sysdm.cpl, and press Enter. - Click the Advanced tab.
- Under Performance, click Settings.
- Click the Advanced tab inside Performance Options.
- Under Virtual Memory, click Change.
- You will see the current page file settings for each drive.
- Note the Recommended size shown at the bottom — Windows calculates this based on your RAM.
Recommended configuration for most users:
- Uncheck Automatically manage paging file size for all drives.
- Select your C: drive.
- Select Custom size.
- Set Initial size to 1.5× your total RAM in MB. Example: 8GB RAM = 12,288 MB.
- Set Maximum size to 3× your total RAM in MB. Example: 8GB RAM = 24,576 MB.
- Click Set, then OK.
- Restart your PC for the change to apply.
How to Move the Page File to a Secondary Drive
If your PC has two drives — for example, an SSD for Windows and an HDD for storage — keeping the page file on the HDD reduces unnecessary write operations on your SSD and extends its lifespan.
- Follow steps 1–6 above to open the Virtual Memory settings.
- Click your C: drive (SSD) → select No paging file → click Set.
- Click your secondary HDD → select System managed size → click Set.
- Click OK and restart your PC.
Note: Only do this if your secondary drive is reasonably fast (7200RPM HDD or another SSD). Avoid putting the page file on an old, slow 5400RPM laptop drive — it will make things worse.
💡 Pro Tip: If your PC has 16GB of RAM or more, you can set the page file to a fixed small size (around 2,048 MB initial and maximum) rather than a large dynamic size. With 16GB+ RAM, Windows rarely needs to use virtual memory for normal tasks. A smaller fixed page file reduces disk activity and keeps your SSD healthier long-term.
⚠️ Common Mistake: Some users disable the page file entirely, believing it forces Windows to use only fast RAM. This is dangerous. Even with 32GB of RAM, Windows and certain applications explicitly require a page file to exist — disabling it completely can cause application crashes, blue screens, and system instability. Always keep at least a small page file active.
14. Keep Your PC Physically Clean to Prevent Thermal Throttling
This is the most overlooked method on this entire list — and possibly the most impactful for older PCs. When dust builds up inside your computer, it blocks airflow and causes your CPU and GPU to overheat. When these components overheat, they automatically slow themselves down through a process called thermal throttling — reducing their speed by up to 50% or more to avoid damage. Your PC feels unbearably slow, and no software fix will help because the problem is physical.
A simple cleaning session can restore your PC to full speed in under 30 minutes.
How to Check If Your PC Is Thermal Throttling
Before opening your PC, confirm that heat is actually your problem. High temperatures are a dead giveaway.
- Download HWiNFO64 (free from hwinfo.com) — a trusted hardware monitoring tool.
- Open HWiNFO64 and click Run in Sensors-only mode.
- Look for your CPU Temperature and GPU Temperature readings.
- Normal idle temperatures: 30–50°C for CPU, 30–45°C for GPU.
- Normal load temperatures: 65–85°C for CPU, 65–85°C for GPU.
- Warning zone: CPU or GPU consistently above 90°C under load — thermal throttling is very likely occurring.
- Also check for a CPU Throttling indicator in HWiNFO — some versions display this directly.
How to Clean Dust from Your Desktop PC or Laptop
Regular cleaning every 6–12 months keeps your PC running at full speed and extends its lifespan significantly.
For desktop PCs:
- Power off completely and unplug from the wall.
- Move the PC to an open area (outdoors is ideal to avoid blowing dust indoors).
- Remove the side panel.
- Use a can of compressed air (available at any electronics or office store for $8–$12).
- Blow short bursts into the CPU heatsink and fan — hold the fan blades still with a pen or your finger to prevent overspin damage.
- Blow compressed air through GPU fans, case fans, and the power supply vent.
- Use a soft brush or dry cloth to wipe dust from surfaces.
- Replace the side panel and reconnect everything.
For laptops:
- Power off and remove the battery if accessible.
- Locate the exhaust vent (usually on the side or bottom).
- Blow compressed air through the exhaust vent in short bursts.
- If your laptop is older than 3 years and still running hot, consider opening the back panel (consult a YouTube tutorial for your specific model) to clean the fan and heatsink directly.
- For severely thermal-throttled laptops, replacing the thermal paste between the CPU and heatsink is a next-level fix that can drop temperatures by 15–25°C.
💡 Pro Tip: After cleaning, use HWiNFO64 to compare your CPU temperatures before and after. Most users see a 10–25°C drop in CPU temperature after a proper cleaning session — and that temperature drop directly translates to faster sustained CPU speeds because the processor no longer needs to throttle. Photograph the temperature readings before and after to see the exact improvement.
⚠️ Common Mistake: Never use a regular household vacuum cleaner inside your PC. Vacuums generate static electricity that can instantly destroy sensitive components like your RAM, GPU, or motherboard. Always use compressed air — and hold GPU and CPU fans still when blasting compressed air to prevent the fan from spinning faster than it was designed to and damaging the bearings.
15. Perform a Clean Windows Reinstall as the Ultimate Speed Reset
When everything else fails — when your PC is still slow after cleaning, removing malware, updating drivers, and optimizing settings — a clean Windows reinstall is the nuclear option. It wipes the slate completely clean, removing all accumulated junk, corrupted files, broken registry entries, and hidden malware in one step. After a clean install, your PC runs exactly as fast as it did on day one.
This is not as scary or complicated as it sounds. Windows makes it easier than ever in 2026.
How to Reset Windows Without Losing Your Files
Windows includes a built-in Reset This PC feature that reinstalls Windows cleanly while giving you the option to keep your personal files.
- Press Windows + I to open Settings.
- Go to System → Recovery.
- Under Recovery options, click Reset PC.
- Choose Keep my files (removes apps and settings but keeps documents, photos, and downloads) OR Remove everything (full wipe — fastest result, cleanest install).
- Choose Cloud download (downloads a fresh Windows image from Microsoft — best option) OR Local reinstall (uses existing Windows files — faster but may preserve some corruption).
- Click Next and review the list of apps that will be removed.
- Click Reset to begin. The process takes 30–90 minutes.
- Your PC restarts automatically and boots into a fresh Windows setup.
Before you reset — back up these items first:
- Documents, Downloads, Desktop files → copy to external drive or cloud
- Browser bookmarks → export from your browser settings
- Product keys for paid software → save to a text file
- Wi-Fi passwords → note them down
How to Do a Full Clean Install Using Windows Media Creation Tool
For the absolute cleanest install — with no trace of the previous Windows installation — use Microsoft’s Media Creation Tool to create a bootable USB and install Windows fresh.
- On a working PC, visit microsoft.com/software-download/windows11 (or windows10).
- Download the Media Creation Tool and run it.
- Select Create installation media (USB flash drive) — use a USB drive with 8GB or more.
- Follow the prompts to download and write Windows to the USB drive.
- Insert the USB into the PC you want to reinstall Windows on.
- Restart and boot from the USB (press F8, F11, F12, or Del during startup to access the boot menu — key varies by manufacturer).
- Follow the Windows setup wizard. When asked where to install, delete the existing partitions on your C: drive and install fresh.
- Complete setup, reinstall your drivers, and restore your backed-up files.
This method gives you the absolute cleanest, fastest starting point possible — a factory-fresh Windows installation with zero bloatware and zero accumulated system baggage.
💡 Pro Tip: After any clean install, resist the urge to immediately reinstall every program you had before. Instead, spend one week installing only what you actually need — one app at a time. This discipline keeps your fresh install clean and fast for months longer than a typical install. Most people discover they need far fewer apps than they thought, and their PC stays noticeably faster as a result.
⚠️ Common Mistake: Many users skip the backup step and proceed directly to Remove everything — then realize immediately after that they lost irreplaceable photos, documents, or work files. A clean install is permanent. There is no undo button. Back up everything you care about to an external hard drive or cloud storage before starting. Spend the 30 minutes on backup — you will never regret it.
🔗 [https://learn.microsoft.com] → “How to Back Up Your Windows PC Before a Clean Install (Complete Checklist)”
Frequently Asked Questions (FAQ) {#faq}
Q: How do I speed up my Windows PC for free?
A: Disable startup programs, run Disk Cleanup, switch to High Performance power mode, and run sfc /scannow in Command Prompt. These four free steps alone deliver a noticeable speed boost on almost any Windows PC.
Q: Why is my Windows 11 PC suddenly so slow?
A: A sudden slowdown usually points to a recent Windows update bug, a background app consuming too much CPU or RAM, or a failing hard drive. Open Task Manager, sort by CPU and Disk usage, and identify the culprit immediately.
Q: Does adding more RAM actually make Windows faster?
A: Yes — but only if RAM is your bottleneck. Open Task Manager → Performance → Memory. If usage sits above 85% during normal tasks, more RAM will make a real difference. Below that, focus on storage or CPU issues first.
Q: Is it safe to use PC cleaning software?
A: Stick to trusted tools like Windows Disk Cleanup, BleachBit, or Privazer. Avoid any tool that promises to “clean your registry” or “boost RAM” instantly — these are almost always ineffective or harmful.
Q: How often should I clean up my Windows PC?
A: Run basic maintenance once a month — Disk Cleanup, Windows updates, and a quick antivirus scan. Run SFC and DISM every 3–6 months. Enable Storage Sense to automate file cleanup in between.
Q: Will upgrading to an SSD really make that big of a difference?
A: Absolutely. Boot times drop from 2–3 minutes to under 20 seconds. Apps open 5–10 times faster. In 2026, a quality 500GB SSD costs under $50. It is the single best upgrade you can make on an older PC.
Q: Should I use third-party PC booster software?
A: No. Most PC booster apps run unnecessary background services and deliver no real-world speed improvement. Everything they claim to do, you can do yourself for free using the built-in Windows tools covered in this guide.
Want all of this in one place — printable, searchable, and always within reach?
Download the FREE Windows PC Speed & Optimization eBook — 10 pages of expert tricks, checklists, and step-by-step guides for making your Windows PC faster, safer, and smarter.
Inside the eBook, you will find:
- A printable monthly maintenance checklist
- 10 advanced registry tweaks (beyond what’s in this article)
- The complete hardware upgrade decision guide
- A malware removal walkthrough from scratch
Download your FREE copy here
No email required. No strings attached. Just pure value from the team at howtofixmypc.com.
Conclusion {#conclusion}
A slow Windows PC is frustrating — but it is almost always fixable. This guide gave you 15 proven methods to speed up your Windows PC without spending a fortune or calling a technician.
Here are the top 3 takeaways to remember:
- Start with startup programs and power settings — These two free fixes deliver the fastest visible improvement with the least effort.
- Clean your drive and manage background processes — Junk files and hidden background apps are silent killers of PC performance. Address them monthly.
- Upgrade to an SSD if you are still on an HDD — No software tweak comes close to the speed transformation an SSD delivers.
Bookmark this article and come back to it every few months as a reference guide. Share it with a friend who is still suffering through a painfully slow PC — they will thank you for it.
Now it is your turn — which method from this guide made the biggest difference on your PC? Drop your answer in the comments below! Your experience might be exactly what another reader needs to hear. 👇