
Introduction
Do you know that right now, hackers could be attacking your PC at the deepest level — and Windows wouldn’t even show you a warning? If you want to protect your PC from core level threats, you need to act before it’s too late.
Most people focus on antivirus software and firewalls. But the most dangerous cyberattacks today go much deeper. They target your PC’s kernel — the core brain of your operating system — where traditional antivirus tools simply cannot reach.
The good news? Windows 10 and Windows 11 come with powerful built-in tools specifically designed to protect your PC from core level intrusions. They’re just turned off by default. In this guide, you’ll learn exactly how to enable them, why they matter, and what else you can do to lock down your system completely.
Table of Contents
1. What Is a Core Level Attack and Why Should You Care?
To protect your PC from core level threats, you first need to understand what those threats actually are.
Your PC’s operating system is built in layers. At the very center is the kernel — a privileged piece of software that controls everything: memory, hardware, processes, and security. Because the kernel runs with the highest level of trust on your system, it’s the ultimate target for hackers.
A core level attack (also called a kernel-level or ring-0 attack) happens when malicious code manages to inject itself into this protected zone. Once inside:
- It can bypass your antivirus completely
- It can steal passwords and banking data silently
- It can install rootkits that survive even a factory reset
- It can disable Windows security features from the inside
- It can remain completely invisible to standard security scans
These aren’t hypothetical risks. Real-world malware families like TDL4, Necurs, and BlackEnergy all operate at the kernel level. Government-level spyware tools also exploit this exact attack surface.
The scariest part? Windows gives you zero warning if this is happening. That’s why enabling the right protections is absolutely critical.
2. Is Your PC Vulnerable Right Now? Here’s How to Check
Before fixing anything, let’s check your current status. This takes less than 60 seconds.
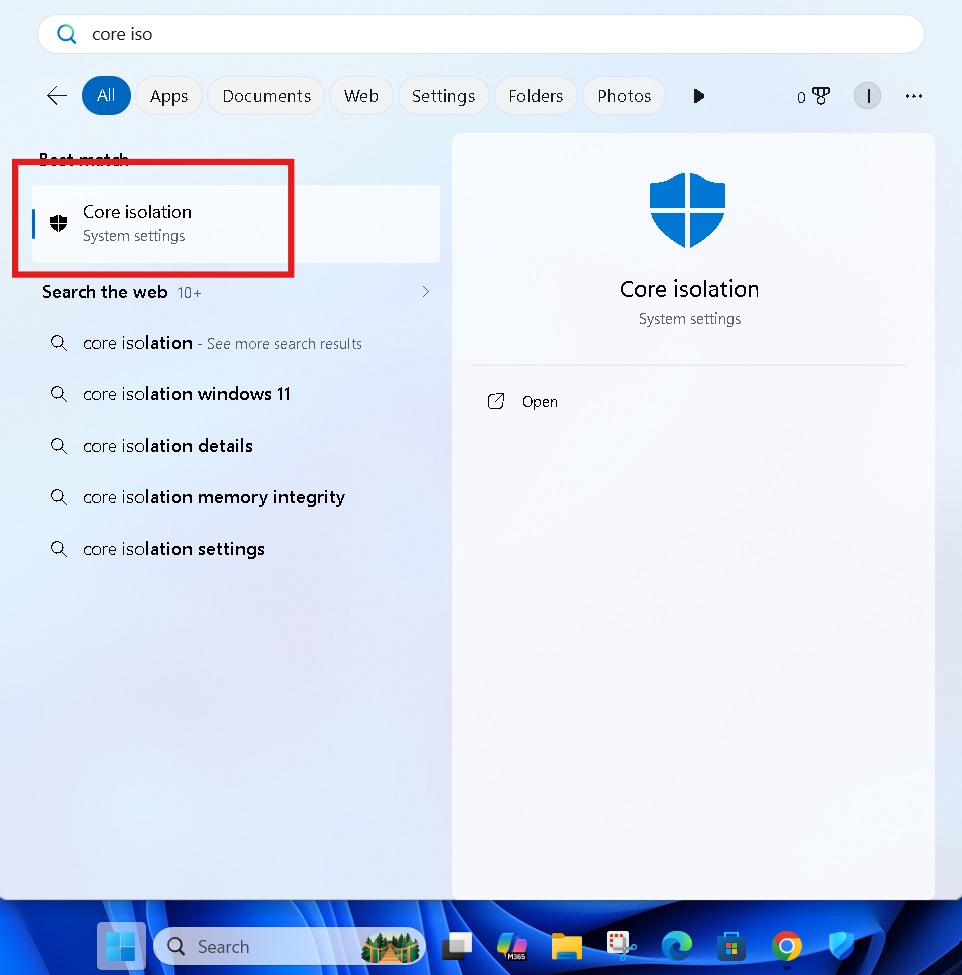
Step 1 — Open the Core Isolation Panel
Press the Windows key on your keyboard and type “Core Isolation” in the search bar.
Click on Core Isolation when it appears in the results. This opens Windows Security directly to the relevant panel.
Step 2 — Look at the Status of These Two Features
You’ll see two main options:
- Memory Integrity
- Kernel-Mode Hardware Stack Protection (available on Windows 11)
If either of these shows OFF — your PC is currently vulnerable to core level injection attacks.
⚠️ Warning: Studies show that a large majority of Windows PCs ship with Memory Integrity turned off by default. Most users never know this setting even exists.
3. How to Enable Core Isolation in Windows
Here’s exactly how to protect your PC from core level threats using the Core Isolation feature.
Step-by-Step: Enable Core Isolation
Step 1: Press Windows + I to open Settings.
Step 2: Click on Privacy & Security (Windows 11) or Update & Security (Windows 10).
Step 3: Click on Windows Security.
Step 4: Select Device Security from the left menu.
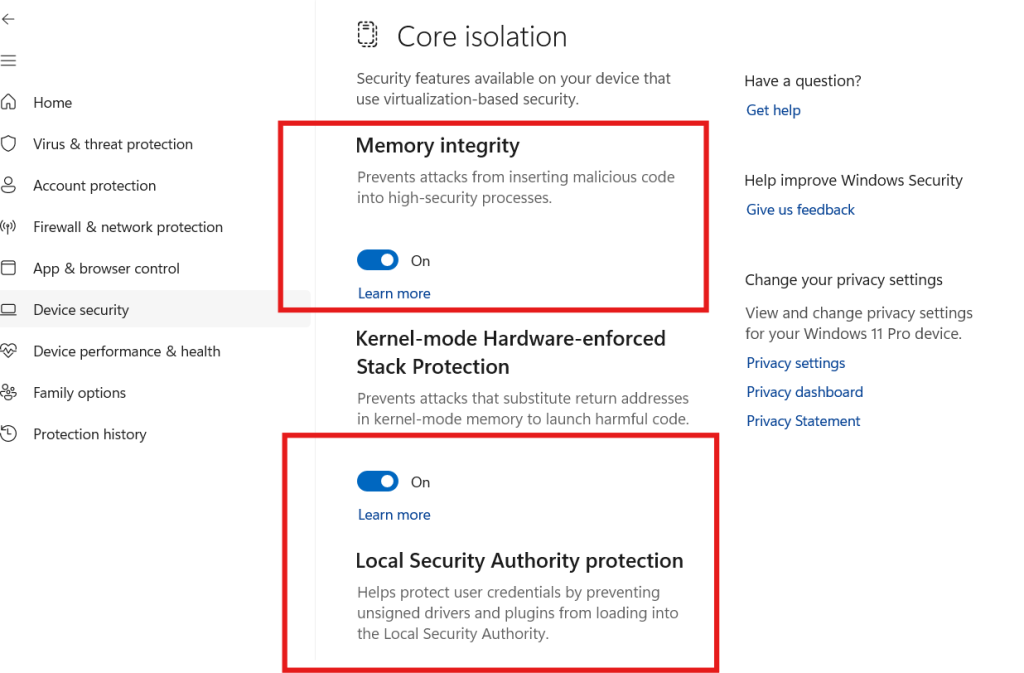
Step 5: Under the Core Isolation section, click Core Isolation Details.
You are now inside the Core Isolation control panel. This is where your most important kernel-level defenses live.
4. How to Turn On Memory Integrity (Step-by-Step)
Memory Integrity (also called Hypervisor-Protected Code Integrity, or HVCI) is the most important setting you need to enable to protect your PC from core level attacks.
What Does Memory Integrity Do?
Memory Integrity uses your PC’s hardware virtualization technology to create an isolated, protected environment for the Windows kernel. Even if malware reaches your system, it cannot inject malicious code into the kernel because the kernel is running inside a secure virtual bubble that untrusted software cannot touch.
How to Turn It On
Step 1: Inside the Core Isolation panel (from the steps above), locate the Memory Integrity toggle.
Step 2: Click the toggle to switch it ON.
Step 3: Windows may prompt you with a warning if an incompatible driver is detected. Note the driver name — you’ll need to update or remove it.
Step 4: Click Restart Now to apply the changes.
After your PC restarts, Memory Integrity will be active and protecting your kernel from malicious code injection.
💡 Pro Tip: If Windows says a driver is incompatible, go to Device Manager, find the flagged device, right-click it, and select Update Driver. Once updated, the Memory Integrity toggle will work without issues.
⚠️ Warning: Some very old drivers (especially for legacy hardware like old graphics cards or audio interfaces) are not compatible with Memory Integrity. If enabling it causes system instability, you may need to disable the incompatible driver or keep Memory Integrity off until the driver is updated by the manufacturer.
5. Enable Kernel Mode Hardware Stack Protection
If you’re on Windows 11, you’ll see an additional option called Kernel-Mode Hardware Stack Protection. This is a newer defense layer that works alongside Memory Integrity.
What Is Kernel-Mode Stack Protection?
It uses your CPU’s hardware-level shadow stack technology to prevent a class of attacks called return-oriented programming (ROP) attacks — a sophisticated technique hackers use to hijack the flow of kernel code execution.
How to Enable It
Step 1: Inside Core Isolation Details, look for Kernel-Mode Hardware Stack Protection.
Step 2: Toggle it ON.
Step 3: Restart your PC.
This feature requires a processor that supports Intel CET (Control-flow Enforcement Technology) or AMD Shadow Stack. Most CPUs from 2020 onwards support this.
6. Other Critical Security Settings to Protect Your PC from Core Level Threats
Memory Integrity is the big one, but there are several more settings that work together to protect your PC from core level attacks. Here’s what else to check.
Enable Secure Boot
Secure Boot prevents unauthorized operating systems and bootloaders from loading before Windows starts. This directly blocks bootkit attacks — malware that infects your system before Windows even loads.
How to check: Go to System Information (press Windows + R, type msinfo32). Look for Secure Boot State — it should say On.
To enable it, you need to access your BIOS/UEFI settings on startup (usually by pressing F2, F12, or DEL during boot) and enable Secure Boot from the Boot settings.
Enable TPM 2.0
The Trusted Platform Module (TPM) is a security chip that stores encryption keys and verifies system integrity. It works hand-in-hand with Core Isolation and Secure Boot.
How to check: Press Windows + R, type tpm.msc, and press Enter. If it says “TPM is ready for use” and shows version 2.0, you’re good.
Turn On Microsoft Defender’s Tamper Protection
This prevents malware from disabling Windows Defender — a common first step in many core level attacks.
How to enable:
- Open Windows Security
- Go to Virus & Threat Protection
- Click Manage Settings
- Scroll down and toggle Tamper Protection to ON
🔗 External Resource: Microsoft’s official guide to Core Isolation and Memory Integrity
7. Keep Your Drivers Updated — The Hidden Security Risk
One of the most overlooked ways hackers bypass core level protection is through vulnerable drivers.
Drivers run at kernel level by design. A driver with a security flaw is an open door directly into your system’s core. This attack technique is called BYOVD (Bring Your Own Vulnerable Driver), and it’s widely used by ransomware gangs and nation-state hackers.
[FEATURED IMAGE SUGGESTION 3] Image: Windows Device Manager showing driver update options ALT Text: Keep drivers updated to protect your PC from core level driver-based attacks
How to Update All Your Drivers
Option 1 — Windows Update: Go to Settings → Windows Update → Advanced Options → Optional Updates and install any available driver updates.
Option 2 — Device Manager:
- Right-click Start → select Device Manager
- Expand each category
- Right-click any device → Update Driver
Option 3 — Manufacturer’s Website: For critical components like your GPU, network adapter, and chipset, always download the latest drivers directly from:
🔗 External Resource: Intel Driver & Support Assistant — automatically detect and update Intel drivers
8. Pro Tips for Advanced Core Level PC Protection
Here are expert-level tips to further protect your PC from core level threats:
- Enable BitLocker — Encrypts your entire drive so stolen data is unreadable, even if a bootkit manages to copy it.
- Use a Standard User Account — Don’t use an Administrator account for daily tasks. Kernel-level attacks need admin rights to escalate — limiting privileges slows them down.
- Enable Windows Defender Credential Guard — Available in Windows 11 Pro and Enterprise. Isolates login credentials in a virtualized environment so kernel-level malware can’t steal them.
- Avoid unsigned software — Only install apps from the Microsoft Store or verified publishers with valid digital signatures.
- Monitor with Windows Security Health Report — Regularly open Windows Security and review your Protection History for any flagged threats.
- Enable Controlled Folder Access — Found in Windows Security under Ransomware Protection, this prevents unauthorized apps from modifying protected system folders.
You Can These Too:
- 📌 How to Increase Laptop Sound — 7 Proven Fixes That Actually Work (2026)
- 📌 PC Blue Screen of Death Fix: 10 Proven Solutions to Stop BSOD
FAQs — Protect Your PC from Core Level Attacks
Q1: What does “core level” mean in PC security?
It refers to your PC’s kernel — the deepest layer of Windows. Attacks here bypass antivirus tools and give hackers full system control without triggering any warnings.
Q2: Is Memory Integrity safe to turn on for all PCs?
Yes, for most modern PCs. Windows will automatically warn you if an incompatible driver is detected before you enable it.
Q3: Will enabling Core Isolation slow down my PC?
Slightly — around 3–5% on older hardware. On any CPU from 2018 onwards, you won’t notice any difference at all.
Q4: Can hackers still attack my PC if Memory Integrity is ON?
It makes kernel-level attacks extremely difficult. No single feature is 100% foolproof, but combining Memory Integrity with Secure Boot and updated drivers makes you a very hard target.
Q5: Why is Memory Integrity turned off by default in Windows?
Microsoft disables it by default to maintain compatibility with older drivers and legacy hardware. You need to turn it on manually.
Q6: How do I know if my PC is already compromised at kernel level?
Watch for: security software disabling itself, unexplained slowdowns, or strange network activity. Run a Microsoft Defender Offline Scan immediately if you’re suspicious.
Conclusion
Knowing how to protect your PC from core level attacks is no longer optional — it’s essential in today’s threat landscape. Hackers are increasingly targeting the kernel because it’s the most powerful and least protected part of your system.
Here’s a quick recap of everything you should do right now:
- Press Windows key → search Core Isolation → open it
- Turn Memory Integrity → ON
- Turn Kernel-Mode Hardware Stack Protection → ON (Windows 11)
- Enable Secure Boot and verify TPM 2.0 is active
- Turn on Tamper Protection in Windows Security
- Keep all drivers updated regularly
- Use BitLocker and a Standard User Account for daily use
Each of these steps takes only a few minutes — but together they create a powerful, layered defense that blocks even sophisticated kernel-level attacks.
Don’t wait until it’s too late. Open Core Isolation right now, flip those toggles, restart your PC, and you’ll immediately be safer than the vast majority of Windows users out there.