Introduction
If you’re struggling with how to increase laptop sound, you’re not alone. Millions of Windows users deal with low, muffled, or weak audio every single day — whether they’re watching movies, attending online meetings, or listening to music. The frustrating part? Your laptop hardware might be perfectly fine. The real problem is almost always a software or settings issue hiding deep inside Windows.
In this guide, you’ll learn exactly how to increase laptop sound using simple, beginner-friendly steps that work on Windows 10 and Windows 11. No technical background needed — just follow along and your audio will be noticeably louder and clearer in minutes.
Table of Contents
1. Why Is My Laptop Sound So Low?
Before jumping into fixes, it helps to understand why your laptop sound is weak in the first place. Here are the most common causes:
- Low system volume — The master volume or app volume might simply be turned down.
- Disabled audio enhancements — Windows has built-in sound improvements that are often turned off by default.
- Wrong audio bitrate — A low bitrate setting limits the richness and power of your audio output.
- Outdated audio drivers — Old or corrupt drivers are one of the biggest culprits behind poor laptop sound.
- Third-party app conflicts — Some apps override your system sound settings without you knowing.
- Hardware limitations — Budget laptops often have weak speakers, but software tweaks can still make a big difference.
The good news? Most of these problems are completely fixable in just a few clicks.
2. Quick Fix First — Check the Obvious Settings
Before diving deep, always check the basics.
- Click the speaker icon in the bottom-right taskbar and drag the volume slider to 100%.
- Right-click the speaker icon and select Open Volume Mixer — make sure no individual app is muted or turned low.
- Check the physical volume keys on your laptop keyboard (Fn + Volume Up).
- Make sure you haven’t accidentally enabled Night Mode or Focus Assist, which can sometimes interfere with audio notifications.
If the problem persists after these checks, move on to the real fixes below.
3. How to Increase Laptop Sound via Windows Sound Settings
This is the most effective method to increase laptop sound in Windows. Follow these exact steps:
Step 1 — Open Windows Settings
Press Windows + I on your keyboard. This opens the Settings app instantly without searching for it.
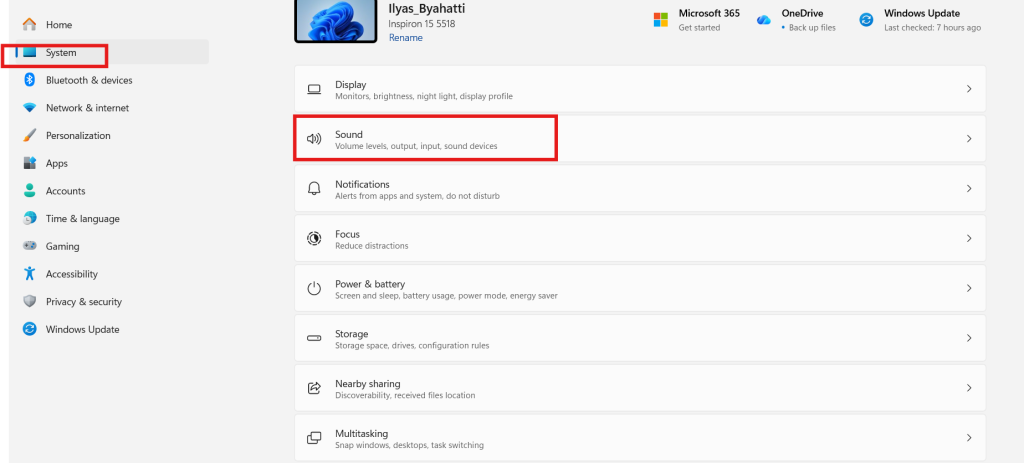
Step 2 — Go to System
Click on System from the left-hand menu. This is where all your core device settings live.
Step 3 — Click on Sound
Inside System settings, click on Sound. You’ll see your master volume controls and a list of connected audio devices.
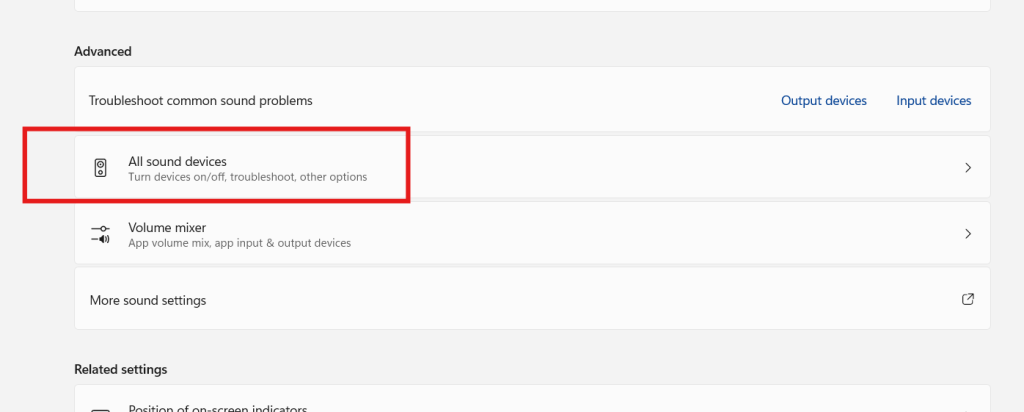
Step 4 — Open All Sound Devices
Scroll down until you see the option that says All Sound Devices and click on it. This will show you every audio input and output device connected to your laptop — including internal speakers, headphones, and Bluetooth devices.
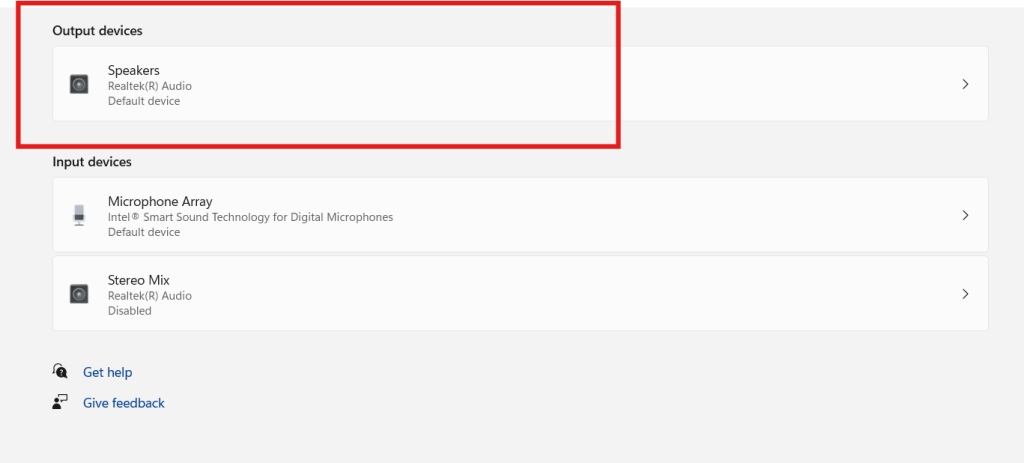
Step 5 — Double-Click on Speakers
Find your active Speakers device and click on it. This opens the detailed output settings for your internal speakers.
4. Set the Highest Audio Bitrate for Better Sound Quality
Once you’re inside the Speaker settings panel, here’s what to do next.
Step 6 — Change the Output Format to Highest Bitrate
Look for the section labeled Output Settings or Format. You’ll see a dropdown menu with different audio quality options like:
- 16 bit, 44100 Hz (CD Quality)
- 24 bit, 48000 Hz (Studio Quality)
- 24 bit, 96000 Hz (High Definition Audio)
- 32 bit, 384000 Hz (Highest)
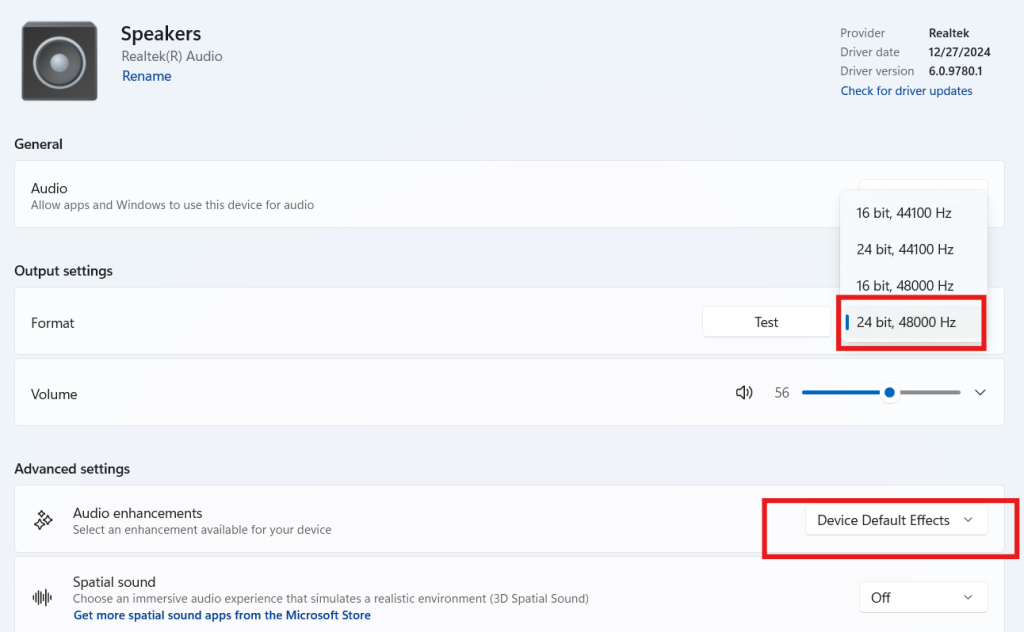
Select the highest available bitrate your device supports. This tells Windows to process audio at the maximum possible quality, which results in richer, fuller, and louder sound output.
⚠️ Warning: Not all laptops support every bitrate. If you hear crackling or distortion after changing this setting, step it back down one level until the audio is clean.
5. Enable Audio Enhancements in Windows
This is the hidden gem most people skip — and it can make a massive difference in how loud and clear your laptop speakers sound.
Step 7 — Turn On Audio Enhancement
Still inside the Speakers settings panel, scroll down and look for a toggle that says Audio Enhancements or Enhance Audio.
Switch it ON.
Windows will now apply built-in DSP (Digital Signal Processing) effects to your audio output, including:
- Loudness Equalization — Boosts quieter sounds to match louder ones, giving you more consistent volume.
- Bass Boost — Adds depth and richness to your audio.
- Virtual Surround — Makes stereo audio feel wider and more immersive.
Once enabled, play any audio or video and you should immediately notice a clear improvement in volume and quality.
💡 Pro Tip: On some laptops (like Dell, HP, or Lenovo), you may also have a dedicated audio app like Dolby Atmos, Bang & Olufsen Audio, or Realtek Audio Console. Open these apps and enable their built-in enhancement presets for even better results.
6. Update or Reinstall Your Audio Driver
If the above steps helped but the sound still isn’t great, the next step is checking your audio driver.
How to Update Your Audio Driver
- Right-click the Start button and select Device Manager.
- Expand Sound, video and game controllers.
- Right-click on your audio device (e.g., Realtek High Definition Audio or Intel Smart Sound Technology).
- Click Update driver → Search automatically for drivers.
- Restart your laptop after the update completes.
If Windows can’t find a newer driver automatically, visit your laptop manufacturer’s website (Dell, HP, Lenovo, ASUS, etc.) and download the latest audio driver manually.
🔗 External Resource: Download Realtek Audio Drivers from the official source 🔗 External Resource: Intel Smart Sound Technology drivers — Intel Support
7. Use Equalizer APO for Maximum Volume Boost
If you want to go beyond what Windows offers natively, Equalizer APO is a free, open-source tool that gives you complete control over your laptop’s audio.
Why Use Equalizer APO?
- Increase volume beyond the 100% Windows limit
- Fine-tune bass, treble, and midrange frequencies
- Apply custom audio filters for your specific speakers
How to Install and Use Equalizer APO
- Download Equalizer APO from sourceforge.net.
- Run the installer and select your speaker output device.
- Restart your laptop.
- Open the Configuration Editor and increase the Preamp slider (try +6dB to start).
- Save the configuration and play audio — the difference is immediately noticeable.
⚠️ Warning: Setting the preamp too high (beyond +12dB) can cause clipping or damage audio quality. Increase gradually and test as you go.
8. Pro Tips to Get Even Better Sound
Here are some extra tips to squeeze even more volume and clarity from your laptop speakers:
- Use a browser extension — Chrome extensions like Volume Master or Boom let you boost audio beyond 100% for videos.
- Clean your speakers — Dust buildup can physically muffle your laptop speakers. Use a soft brush or compressed air to gently clean the grilles.
- Use a Bluetooth speaker — If your internal speakers are too weak, pairing a portable Bluetooth speaker is the fastest upgrade.
- Restart the Windows Audio Service — Press Windows + R, type
services.msc, find Windows Audio, right-click, and select Restart. - Check power plan settings — Some power-saving modes throttle audio performance. Switch to High Performance mode in Power Settings.
[FEATURED IMAGE SUGGESTION 3] Image: Windows Device Manager showing Sound, video and game controllers section ALT Text: Update audio driver to help increase laptop sound on Windows 10 and 11
🔗 External Resource: Microsoft’s official guide to fixing sound problems in Windows
🔗 You Can Check These Too..
- 📌 PC Blue Screen of Death Fix: 10 Proven Solutions to Stop BSOD
- 📌 Create Restore Point on Windows PC to Protect Your System From Crashes
FAQs — How to Increase Laptop Sound
Q1: Why is my laptop sound so low even at 100% volume?
This usually happens because Audio Enhancements are disabled, or your audio driver is outdated. Follow the steps in this guide — especially enabling Audio Enhancements and setting the highest bitrate — to fix this instantly.
Q2: How do I increase laptop sound beyond 100% in Windows?
Windows caps the volume at 100% by default, but you can go beyond that using tools like Equalizer APO (adjust the Preamp) or browser extensions like Volume Master for YouTube and other web-based audio.
Q3: Does changing the audio bitrate increase laptop volume?
Yes, indirectly. Setting a higher bitrate (like 24-bit, 96000 Hz) gives Windows more audio data to work with, resulting in fuller, richer, and often louder-sounding audio from the same speakers.
Q4: Will enabling Audio Enhancements damage my laptop speakers?
No. Windows Audio Enhancements are safe to enable. They use software-level processing and don’t push hardware beyond its limits. However, Loudness Equalization can sometimes cause slight distortion at maximum volume on very low-quality speakers.
Q5: How do I increase sound on a laptop without installing software?
You can increase sound without any extra software by: (1) enabling Loudness Equalization in Sound Settings, (2) setting the highest audio bitrate, and (3) updating your audio driver — all of which are built into Windows.
Q6: Which laptops have the best built-in sound?
Laptops with premium audio setups include those with Bang & Olufsen (HP Spectre), Harman Kardon (Lenovo ThinkPad/IdeaPad), Dolby Atmos (Dell XPS, Microsoft Surface), and Sonics Master (Sony VAIO). But even budget laptops can sound significantly better after applying the fixes in this guide.
Conclusion
Now you know exactly how to increase laptop sound using Windows’ built-in settings and a few smart tools. To recap the most important steps:
- Open Settings → System → Sound → All Sound Devices → Speakers
- Set the Output Format to the highest available bitrate
- Enable Audio Enhancements
- Update your audio driver if needed
- Use Equalizer APO for maximum volume boost beyond Windows limits
These fixes work on virtually every Windows 10 and Windows 11 laptop — from budget models to high-end machines. Most users notice a dramatic improvement just from steps 2 and 3 alone.
Did these fixes work for you? Drop a comment below and let us know which step made the biggest difference! And if you’re still having audio trouble, check out our full guide on How to Fix No Sound on Windows 11 for more advanced solutions.