Introduction
If you want to record desktop screen on Windows, you no longer need heavy third-party software or complicated screen recording tools. Many users don’t realize that Windows now includes a built-in screen recording feature inside the Snipping Tool. It works smoothly, records video with system actions, and is perfect for tutorials, demos, online classes, troubleshooting videos, or work presentations.
In this guide, you’ll learn a simple step-by-step method to record desktop screen on Windows using the Snipping Tool. This article expands your short script into a complete beginner-friendly tutorial with explanations, tips, FAQs, and best practices.
Table of Contents
Why Screen Recording Is Useful on Windows
Screen recording has become an essential skill for:
- Students creating project demos
- Teachers recording tutorials
- Professionals explaining tasks
- IT support teams sharing fixes
- Freelancers creating client walkthroughs
- Content creators making short videos
Instead of explaining something repeatedly, you can simply record your screen once and share the video. Knowing how to record desktop screen on Windows saves time and improves communication.
What Tool Is Used to Record Desktop Screen on Windows
Windows includes a built-in app called Snipping Tool. Originally designed for screenshots, it now supports screen video recording in Windows 11.
Advantages of using Snipping Tool:
- No installation required
- Free and built-in
- Simple interface
- Lightweight and fast
- Safe and trusted by Microsoft
Microsoft officially documents Snipping Tool features here (DoFollow):
https://support.microsoft.com/windows
This makes Snipping Tool a reliable choice to record desktop screen on Windows.
How to Record Desktop Screen on Windows (Step-By-Step Guide)
Below is the expanded version of your script with clear explanations.
Step 1: Press Windows + R
- Press Windows + R on your keyboard
- The Run dialog box will open
This shortcut allows you to quickly launch Windows tools.
Step 2: Type snippingtool and Hit Enter
- In the Run box, type snippingtool
- Press Enter
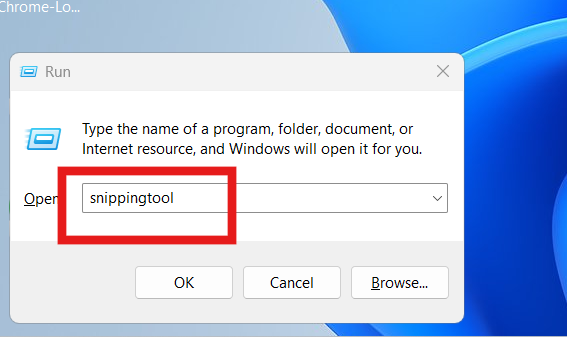
The Snipping Tool application will open.
This tool is the main application used to record desktop screen on Windows.
Step 3: Select Video Mode
At the top of the Snipping Tool window:
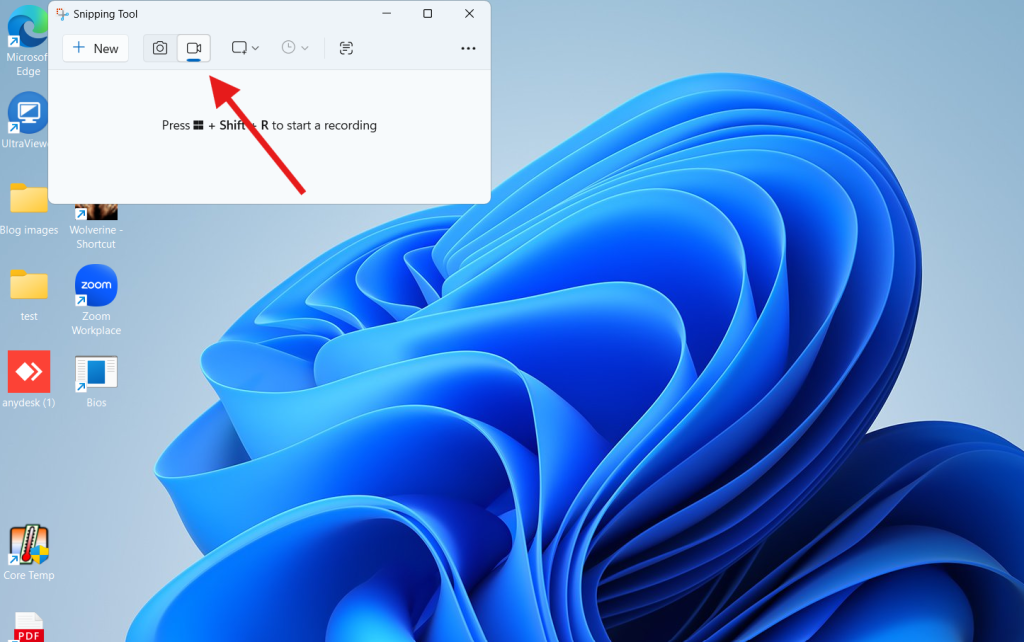
- Click on the Video icon
- This switches Snipping Tool from screenshot mode to screen recording mode
Many users miss this step. Make sure Video mode is selected.
Step 4: Click on New
- Click New
- Your screen will dim slightly

This means Windows is ready to capture your screen activity.
Step 5: Select the Area You Want to Record
- Use your mouse to drag and select the screen area
- You can select:
- A specific window
- A browser tab
- A portion of the desktop
- Almost the entire screen
Choosing a smaller area helps reduce file size and keeps videos focused.
Step 6: Click Start to Begin Recording
- After selecting the area, click Start
- A short countdown begins
- Recording starts automatically
Now perform the actions you want to capture.
This is the key step to record desktop screen on Windows.
Step 7: Click Stop to End Recording
- When finished, click Stop
- Snipping Tool will automatically open the recorded video
You can now preview, save, or share the video.
Step 8: Save and Use the Recorded Video
- Click Save
- Choose a location on your PC
- The video is saved in MP4 format
You can now:
- Upload it to YouTube
- Share via WhatsApp or email
- Add it to presentations
- Use it for training or support
You have successfully learned how to record desktop screen on Windows.
Where Screen Recordings Are Saved
By default:
- You choose the save location manually
- Videos are saved as .mp4 files
- Compatible with all video players
For easy access, save recordings in:
- Documents
- Videos folder
- Desktop
Common Mistakes to Avoid
Avoid these issues when trying to record desktop screen on Windows:
- Forgetting to switch to Video mode
- Selecting too large an area
- Recording sensitive information
- Closing Snipping Tool while recording
- Not checking microphone settings
Always test a short recording first.
Extra Tips for Better Screen Recording
1. Close unnecessary apps
Reduces lag and distractions.
2. Clean desktop before recording
Makes videos look professional.
3. Increase display scaling if text is small
Settings → Display → Scale.
4. Use external mic for voice
Improves audio quality.
5. Free up C drive space
Low storage can interrupt recording.
Internal link: /free-up-c-drive-space
6. Fix slow PC before recording
Lag affects video quality.
Internal link: /fix-slow-windows-pc
Video Guide
FAQs About How to Record Desktop Screen on Windows
Is Snipping Tool screen recording free?
Yes. It is completely free and built into Windows.
Can I record audio using Snipping Tool?
Yes, system and microphone audio are supported depending on Windows version.
Can I record the entire screen?
Yes, by selecting a large area.
Is Snipping Tool available on Windows 10?
Screen recording is primarily available in Windows 11.
Are there time limits for recording?
No fixed limit, but long recordings depend on system resources.
What format is the recorded video saved in?
MP4 format.